FYI: This website contains affiliate links. As an Amazon Associate I earn from qualifying purchases.
- Home
- Water Collection
- Barrel Overflow
Rain Barrel Overflow Routing: Where to Send the Extra Water
By Amy DeVries
Short answer: Rain barrel overflow routing takes care of the extra water that leaves a barrel once it's full. Send it at least 5 to 10 feet from your foundation, away from walkways and your neighbor's yard. The simplest route is a hose from the overflow port to a garden bed or mulched area. You can also link a second barrel, or send bigger flows to a French drain or dry well. Whatever you choose, the overflow needs to carry water out as fast as the downspout brings it in.
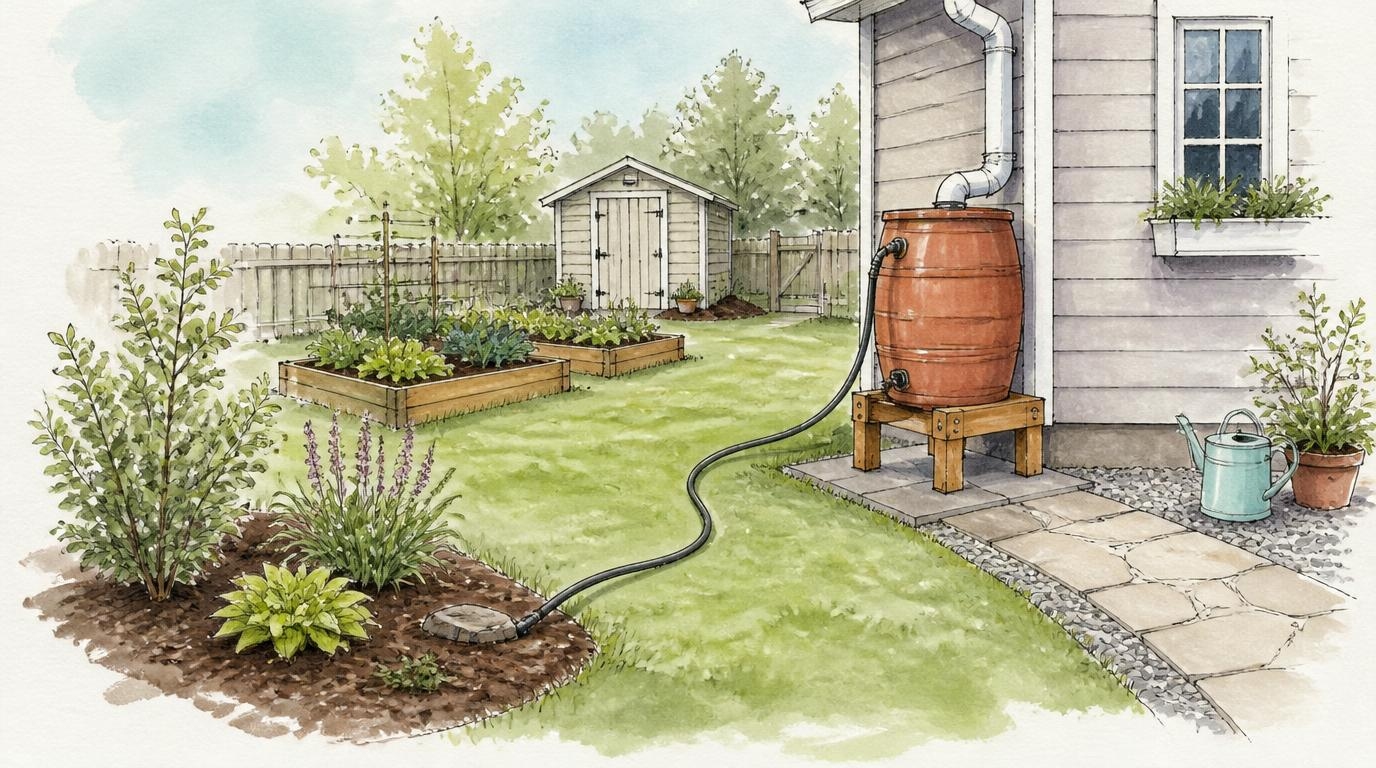 A full barrel always sends water somewhere. A short hose to a mulched bed is often all it takes to send it somewhere helpful.
Our first rain barrels sat under open downspouts with a screen on top. In a downpour, two things happened: Water shot out of the downspout and right past the barrel. And once the barrels were full, the extra spilled over and ran wherever it wanted.
Our yard slopes, and our gutters drained to the low end, right by our walkout basement door. That's exactly where you don't want extra water to collect.
If your barrel is overflowing, it isn't failing. It's full, and that's normal. Planning where the extra goes is usually one hose and a few minutes, not a drainage project. Start with the smallest route that works, and upgrade only if it can't keep up.
Why rain barrel overflow routing matters
A barrel gathers the water from a whole section of roof and lets it out in one spot. When you cut a downspout short for a barrel, you often remove the extension or splash block that used to carry that water away. Now the overflow has to do that job.
If it doesn't, here's where the trouble shows up:
- Foundations. Water that pools against the house can seep into basements and crawl spaces and wear on the foundation over time.
- Walkways and steps. Puddles and mud are a nuisance in summer and an ice hazard in winter.
- Soggy spots. A patch of lawn or a bed that never dries out can drown plant roots and give mosquitoes a place to breed.
- Your neighbors. Water running onto someone else's property is a quick way to strain a good relationship, and some towns have rules about it.
How fast does a barrel fill? One inch of rain on 1,000 square feet of roof is about 600 gallons. A 55-gallon barrel can fill with less than a tenth of an inch of rain. In most real storms, far more water passes through your barrel than stays in it.
Overshoot or overflow?
These look alike from the window, but they need different fixes.
- Overshoot is water that misses the barrel. It shoots out of an open downspout and past the opening, like our first barrels did. A diverter usually fixes it. See Downspout Diverter Options.
- Overflow is water leaving a full barrel. That's what this page covers.
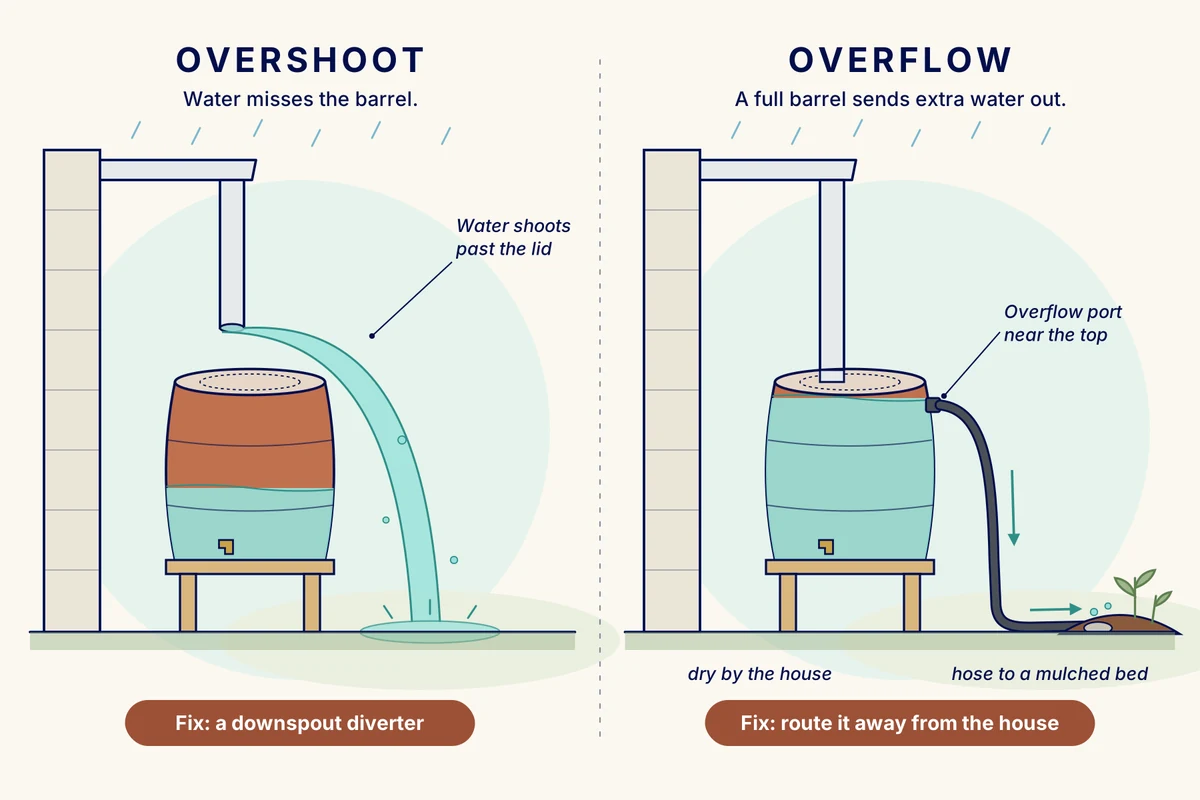
Overflow routes, from easiest to most work
Pick the first route that fits your yard. If it keeps up through a few big storms, you're done. Move to the next one only when it solves a problem you actually have.
Using a diverter? Many downspout diverters send water back down the downspout once the barrel is full. If yours does, the downspout handles most of the overflow, as long as the bottom of the downspout already carries water away from the house. See Downspout Diverter Options.
1. A hose to a garden bed or mulched area
This is the simplest route, and for many yards it's the only one you'll ever need.
- Attach a hose to the overflow port and run it at least 5 to 10 feet from the house.
- Keep it going downhill the whole way. Water won't flow uphill, and a dip or kink lets it back up.
- End it somewhere that can soak up water, like a mulched bed, the base of shrubs, or a patch of lawn. A few rocks or a splash block at the end keeps it from digging a hole.
- Choose a spot that tolerates wet feet. Skip beds of plants that hate soggy roots, and stay away from the low spot by a door or walkway.
This is where our slope taught us a lesson. Water always heads to the low end of the yard, so look at where your yard drains before you pick the outlet. Looking back, I wish we'd routed our gutters toward the top of the hill when we redid the roof.
What to use: A garden hose works if your overflow port has a hose fitting. A wider flexible drain hose carries more water, which helps in heavy rain. You can shop for a flexible downspout extension on Amazon (affiliate link). It's worth it if your barrel's overflow port is wide enough to fit it. If your barrel only has a small hose-size overflow, a wider hose won't help, so check the port first.
2. Linking a second barrel
If your barrel overflows every storm and you still run out of water in summer, a second barrel turns that overflow into more storage.
- Set the barrels on stands at slightly different heights. See Rain Barrel Stand Design.
- Run a hose from the first barrel's overflow port into the second barrel. Water fills the higher barrel first, then spills into the lower one.
- The last barrel still needs its own overflow route. Linking barrels adds storage. It doesn't make the extra water disappear.
What to use: A rain barrel linking kit includes the fittings and hose. Here's an affiliate link to the actual connector hose we're using right now. I'd skip it until one barrel is regularly full and you're still short on water. A second barrel you rarely fill is just more to clean and winterize.
If your barrels are always full and overflowing, you may also just need to use more of the water. See Gravity Drip Irrigation Rain Barrels. We expanded the garden and ended up using four rain barrels!
3. A French drain or dry well
These routes take overflow underground. They're the most work, so save them for spots where a surface hose won't do, like a barrel tight against the house or right next to a walkway.
- A French drain is a trench filled with gravel, usually with a perforated pipe inside, that spreads water out and lets it soak in along its length.
- A dry well is a gravel-filled pit, or a buried perforated container, that holds water underground while it soaks into the soil.
Near our house, a buried overflow hose runs to an underground gravel French drain by a walkway. The water goes underground instead of across the path, and the walkway stays dry.
Before you dig:
- Call 811 a few days ahead. It's free, and they'll mark buried utility lines.
- Check your soil. Dig a hole about a foot deep, fill it with water, and watch how fast it drains. If water is still standing the next day, your soil may not soak up overflow fast enough for a dry well.
- Check local rules. Some towns and HOAs regulate drainage changes and where water can be discharged.
- Stay away from the foundation and any septic system, and keep the outlet end downhill from the house.
This is a weekend project with a shovel, not a first step. If a hose to a mulched bed keeps up with water absorption, you don't need it.
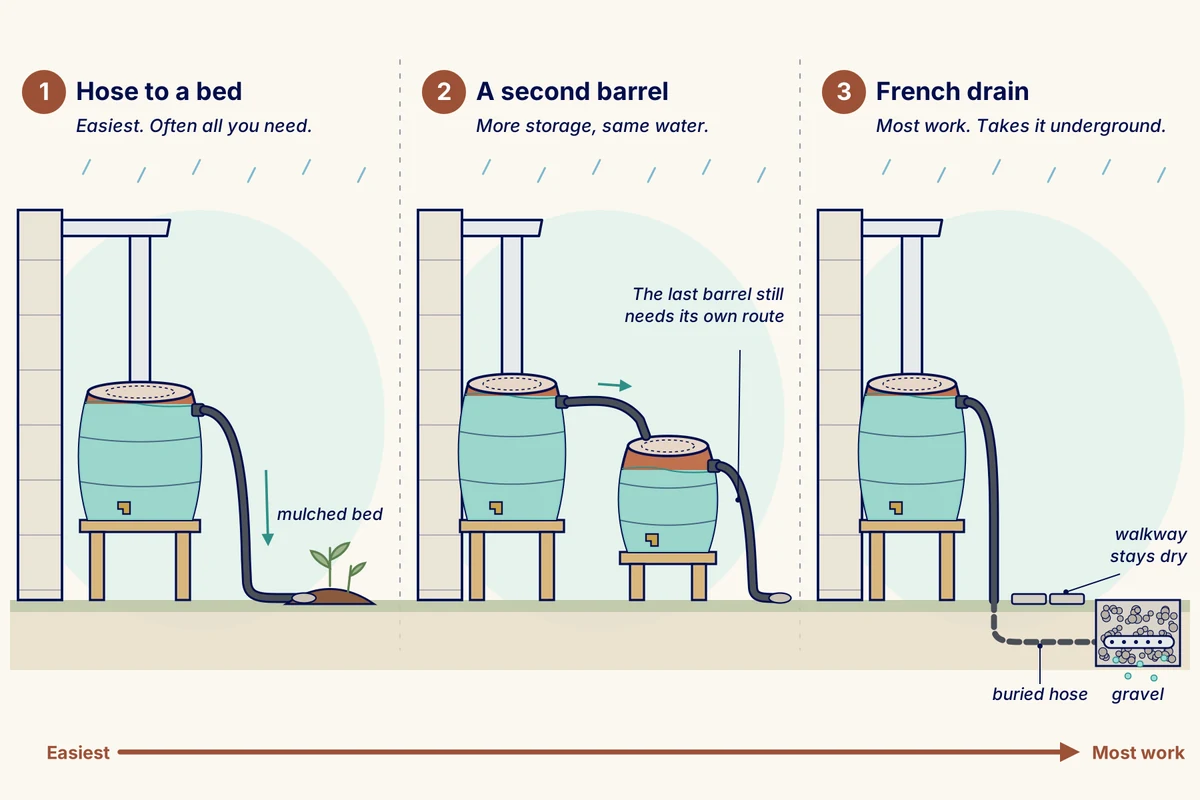 Three ways to handle rain barrel overflow routing, from easiest to most work. Start with the first one that fits your yard.
Sizing the overflow so it keeps up
The overflow has to let water out as fast as the downspout brings it in. If it can't, water backs up and spills over the lid or around the inlet, often right at the base of the barrel, which is the spot you were trying to protect.
Many store-bought barrels have a small, hose-size overflow fitting. In a heavy summer downpour, a downspout can deliver more water than that fitting can carry.
How much water is that? In a downpour of 1 inch an hour, every 100 square feet of roof sheds about 1 gallon a minute. So a downspout draining 500 square feet of roof in a 2-inch-an-hour summer storm brings in about 10 gallons a minute. With only gravity pushing it, a garden hose usually can't carry that much.
Rule of thumb: Make the overflow at least as big as whatever feeds the barrel. If your barrel has a wide overflow port, use a matching wide drain hose or pipe instead of a garden hose.
If your overflow can't keep up, try these, in order:
- Shorten and straighten the hose. Long runs, kinks, and uphill sections all slow water down.
- Use a diverter that sends extra water back down the downspout once the barrel is full. See Downspout Diverter Options.
- Use a wider overflow fitting and hose, if your barrel has room for one. Wider is better than longer.
Keep a screen over every opening, overflow ports included, so mosquitoes can't slip in. See Mosquito-Proof Rain Barrel.
Quick test: During the next heavy rain, step outside for a few minutes. If water is flowing steadily out of the overflow and nothing is spilling over the lid, it's keeping up.
Not sure if water collection is the right first step for you? My free 2-page guide, Which Urban Homestead System Should You Start First?, helps you pick the system that fits your space and your time.
Checking your rain barrel overflow routing after big storms
A quick walk after a big storm tells you whether your plan for rain barrel overflow routing is working. It takes about five minutes.
- Look where the water went. Check near the foundation, doors, and walkways for puddles or mud.
- Clear the overflow port. Leaves, seeds, and grit can clog it or the screen over it.
- Check the hose. Look for kinks, crushed spots, or a hose that pulled loose. For a buried hose, check the outlet end.
- Look at the outlet. If water is digging a hole or washing mulch away, add a few rocks or a splash block.
- Check that the barrel is still level. Soggy ground can let a stand shift or sink. See Rain Barrel Stand Design.
- Watch the French drain or dry well, if you have one. If water stands on top long after the rain stops, it may be clogged or too small.
You don't have to get rain barrel overflow routing perfect the first time. Most overflow plans need one small adjustment after the first real storm, and that's how you learn how water moves in your yard.
Ready to plan more than one barrel? The Small-Space Self-Sufficiency Starter Map helps you choose your first 3 homestead systems and decide what to start now, what to start next, and what to save for later, with a 30-day action map.
Rain barrel overflow routing FAQ
How do I route rain barrel overflow away from the foundation on a small urban lot (without causing erosion)?
How do I route rain barrel overflow away from the foundation on a small urban lot (without causing erosion)?
You don't need a long run, just a safe place for the water to land.
- Go at least 5 to 10 feet from the house, farther if the ground slopes toward it.
- Spread the water out instead of dumping it in one spot. End the hose on a splash block or a few flat stones, in mulch, or in a short, shallow trench lined with river rock, like a mini dry creek bed.
- Pick a spot covered in plants or mulch, never bare soil on a slope, where moving water digs channels fast.
- Short on space? A diverter that sends extra water back down the downspout, plus a downspout extension, may be all you need.
For one of our spots near the house, we send overflow underground, through a buried hose to a gravel French drain by the walkway.
Where should I discharge rain barrel overflow so it doesn't flood a neighbor's yard?
Where should I discharge rain barrel overflow so it doesn't flood a neighbor's yard?
- Keep the outlet on your own property, well back from the property line, so the water soaks in before it gets there.
- Point it away from the line, not toward a fence, a shared driveway, or a neighbor's low spot.
- Watch where water already runs in a storm. If runoff naturally heads toward your neighbor, slow it down first with a mulched bed or rain garden, or choose a different outlet.
- Keep it off sidewalks and alleys, where it can turn to ice in winter.
- Check your town's and HOA's rules. Many places limit where you can send runoff, and tying into a storm drain may need a permit.
If your yards share a low spot, a friendly conversation about rain barrel overflow routing and drainage before the first big storm goes a long way.
How do I design a rain garden (or infiltration basin) specifically for rain barrel overflow?
How do I design a rain garden (or infiltration basin) specifically for rain barrel overflow?
A rain garden is a shallow, planted dip that holds overflow for a day or so while it soaks into the ground. It's a bigger project than a hose to a mulched bed, so try that first. When you're ready:
- Pick the spot. It should be at least 10 feet from the house and downhill from the barrel, away from buried utility lines and any septic system. Skip spots where water already stands for days.
- Test the drainage. Dig a hole about a foot deep and fill it with water. If it drains within a day, the spot works.
- Size it. Extension guides often suggest a rain garden about a fifth to a third the size of the roof area draining into it, larger in clay soil. For a 300-square-foot roof section, that's about 60 to 100 square feet. A smaller garden still helps; it just fills up more often.
- Shape it. Dig it 4 to 8 inches deep with a flat bottom. Use the soil you dig out to build a low berm on the downhill side, and line the spot where the hose enters with stones so the water doesn't scour.
- Plant it with deep-rooted native plants that handle both soggy spells and dry ones, then mulch.
- Plan for the overflow's overflow. In a big storm, the rain garden fills too, so make sure the low point of the berm spills somewhere safe.
Your local extension office often has a free rain garden guide for your area, and some towns offer rebates.
Why does my rain barrel overflow back up into the downspout, and how do I prevent it?
Why does my rain barrel overflow back up into the downspout, and how do I prevent it?
Backup happens when water comes in faster than it can leave, so the level rises past the overflow port and up into the downspout. Water can then spill out of gutter seams near the house, or freeze in the downspout in winter. Common causes:
- The overflow is too small for the downspout feeding the barrel.
- The overflow port or its screen is clogged.
- The hose runs uphill, sags, or kinks.
- The downspout is sealed tightly into the lid, so the water's only way out is the overflow.
To prevent it, use a wider, shorter overflow that runs downhill, and keep its screen clear.
Using a diverter? A little water backing up into the diverter is normal. That's how many diverters sense that the barrel is full and send the rest down the downspout. Most need to be mounted about level with the top of the barrel, so check your diverter's instructions. See Downspout Diverter Options.
Why does my rain barrel overflow line clog, and how do I design it to stay clog-resistant?
Why does my rain barrel overflow line clog, and how do I design it to stay clog-resistant?
The overflow carries whatever floats at the top of the barrel: leaves, seeds, pollen, roof grit, and algae scum. It clogs where it narrows, at a screen, and at low spots where sediment settles. Spiders and insects also like to nest in the dry end of a hose.
- Stop debris before it gets in with a leaf screen on the gutter or downspout. A first flush diverter also catches the dirtiest water. See First Flush Diverter Basics.
- Use the widest, smoothest hose or pipe you can, with as few bends as possible.
- Keep a steady downhill slope for the rain barrel overflow routing with no sags.
- Put the screen where you can reach it, at the overflow port rather than deep in the line, so cleaning takes seconds.
- For a buried line, use solid pipe until it reaches the drain, and keep the start of the line easy to reach so you can flush it with a garden hose.
- Keep sunlight out of the barrel so algae doesn't build up. See Preventing Algae in Rain Barrels.
How do I winter-proof a rain barrel overflow line so it doesn't freeze or crack fittings?
How do I winter-proof a rain barrel overflow line so it doesn't freeze or crack fittings?
Where winters freeze, the safest plan is to take the barrel and its overflow out of service before the first hard freeze:
- Empty the barrel and let the overflow hose drain completely.
- Remove the spigot and any loose fittings, and store them indoors. Water trapped inside a fitting is what cracks it.
- Disconnect the overflow hose and store it, or lay it out so every bit of it drains.
- Reconnect the downspout and its extension, so winter rain and snowmelt still drain away from the foundation.
For a buried line that stays in place, make sure it slopes downhill the whole way to an open outlet, so no water sits in it. After a freeze and thaw, check the outlet for ice plugs. See Winterizing Rain Barrels.
Overflow checklist
Here's the page in one place. Use the first part to pick a route, and come back to the rest after big storms and before winter.
Pick your route
- Figure out where your yard drains, and keep the outlet away from that low spot.
- Start with a hose to a mulched bed, shrubs, or lawn at least 5 to 10 feet from the house.
- Link a second barrel only if one stays full and you still run short on water.
- Save a French drain or dry well for spots where a surface hose won't work.
Set it up
- Make the overflow at least as big as whatever feeds the barrel.
- Keep the hose short, straight, and downhill the whole way.
- End it on a splash block, stones, or mulch so it doesn't dig a hole.
- Keep the outlet on your own property and off walkways.
- Screen the overflow port so mosquitoes can't get in.
- Call 811 before you dig anything.
After big storms
- Check for puddles near the foundation, doors, and walkways.
- Clear the overflow port and its screen.
- Look for kinks, crushed spots, or a hose that pulled loose.
- Make sure the barrel is still level.
Before winter
- Empty the barrel and let the overflow hose drain.
- Disconnect the hose, and reconnect the downspout and its extension.

Amy DeVries helps beginner urban homesteaders learn by doing. A lifelong gardener, she has grown food in spaces that expanded to 16 raised beds, patio containers, dwarf fruit and nut trees, and gravity-fed rainwater systems. She shares practical lessons shaped by real experience. Amy homeschools her children and teaches the same hands-on skills that guide her work.
You might like these
Rain Barrels: A Beginner's Guide
How to choose, place, and set up your first rain barrel, with real lessons from our own rain barrels and links to every next step.
Rain Barrel Stand Designs for Real Yards and Setups
Choose the best rain barrel stand designs for your yard, barrel, and skill level, with practical guidance on height, base prep, materials, and safety.
Downspout Diverter Options: What Happens When It Overflows
Compare downspout diverter options by what they do when your rain barrel fills up, and what each setup can realistically water.


More Information
Disclosure
All information found on this website is editorial in nature and intended to motivate and inspire rather than be used as medical advice or legal advice.
As an Amazon Associate, I earn from qualifying purchases. I also use Google Ads and cookies as described in the Privacy Policy.
Thank you for your support!
By Amy DeVries, Copyright © 2011-2026 Sage-Urban-Homesteading.com All rights reserved.
