FYI: This website contains affiliate links. As an Amazon Associate I earn from qualifying purchases.
- Home
- Water Collection
- Winterizing Rain Barrels
Winterizing Rain Barrels: How to Drain and Store Them Before a Freeze
By Amy DeVries
Short answer: For winterizing rain barrels, you need to empty it before the first hard freeze, leave the spigot open or take it off, and unhook any hoses. Store the barrel indoors, upside down, or covered and tied down so rain and snow can't refill it. Then reconnect or extend your downspout so winter rain flows away from your house.
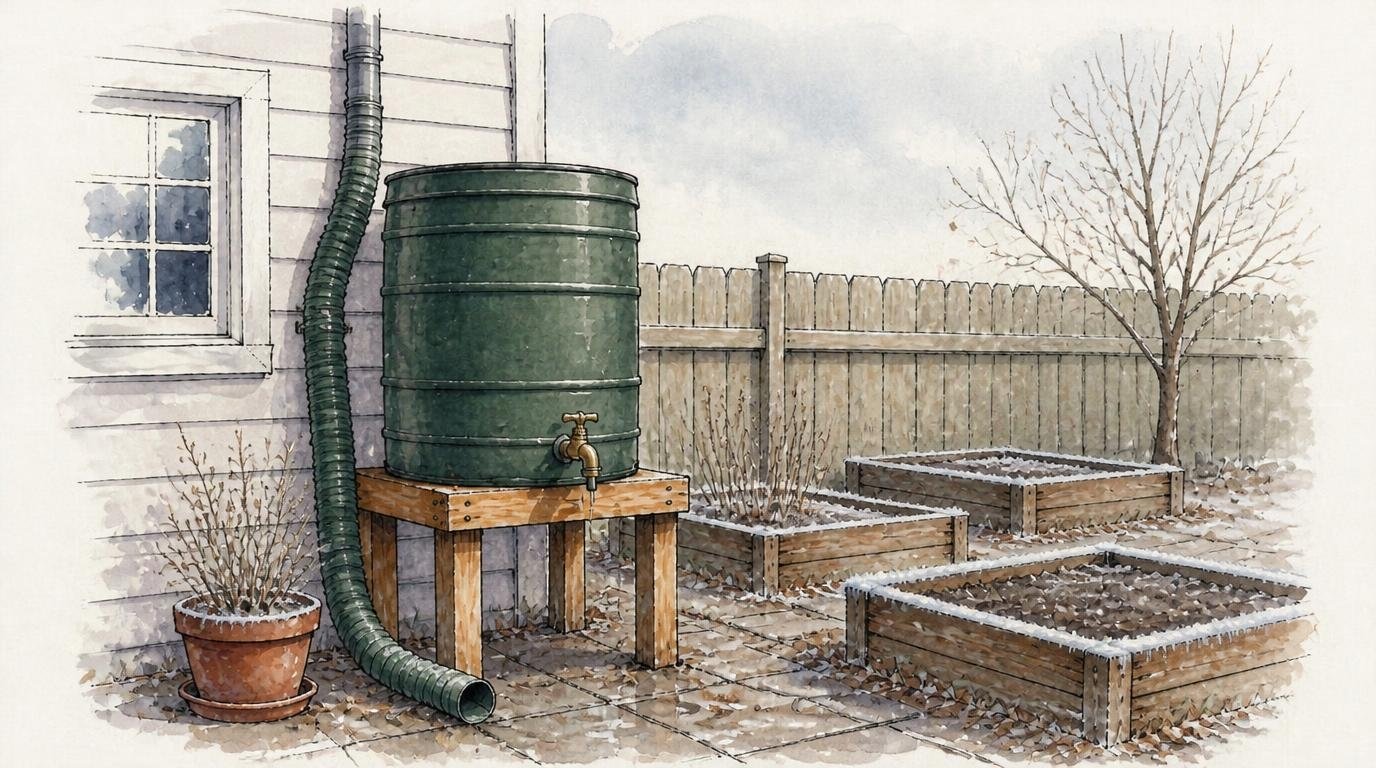 Once the barrel is empty, the downspout goes around it until spring.
One winter, the bottom of one of our rain barrels froze and cracked. It was a barrel made of thin plastic, and that was the end of it. We only use barrels made of heavier plastic now.
That's really the whole reason to winterize. Water left sitting in a barrel or a spigot freezes, expands, and splits whatever is holding it. A few minutes in the fall saves you from buying a new barrel in the spring.
When winterizing rain barrels, you don't need a garage with room to spare or any special gear. We don't have either. Our barrels are too rounded to sit upside down, and there's no way we'd have room to store them inside. So we drain them, leave the spigots open, unhook the hoses, and they stay outside all winter. Start with that simple version, and add a cover or a storage spot later only if wind or snow becomes a real problem for you.
If you're reading this after your first freeze, you haven't ruined anything yet. Drain the barrel on the next mild day and check it for cracks.
Why freezing damages rain barrels
Water grows by about 9 percent when it turns to ice. In a closed space, that ice pushes hard on whatever is around it.
In a rain barrel, that usually shows up in a few places:
- The bottom of the barrel. Water collects there last, so it's often the part that freezes solid. That's where ours cracked.
- The spigot. A closed spigot traps a little water inside the valve. When it freezes, it can crack the valve or push out the seal.
- Fittings and hoses. Threaded ports, linking hoses, and overflow hoses all hold small pockets of water that can split.
- Thin plastic. Thin or brittle plastic doesn't flex much, so it cracks more easily than a thick barrel.
The tricky part is that you often won't see the damage until spring, when you fill the barrel and find a slow leak.
If you're shopping for a barrel, a heavier plastic one is worth it in a cold climate. See How to Set Up a Rain Barrel.
When to finish winterizing rain barrels
Finish winterizing rain barrels before your first hard freeze. That's when it drops to about 28°F and stays there for a few hours, which is cold enough to freeze standing water solid.
Don't rush to unhook your barrel at the first light frost, though. Watering the garden before a cold night can help plants make it through a light frost, because moist soil holds heat better than dry soil. If you still have greens or other crops in the ground, your barrel is still doing a job.
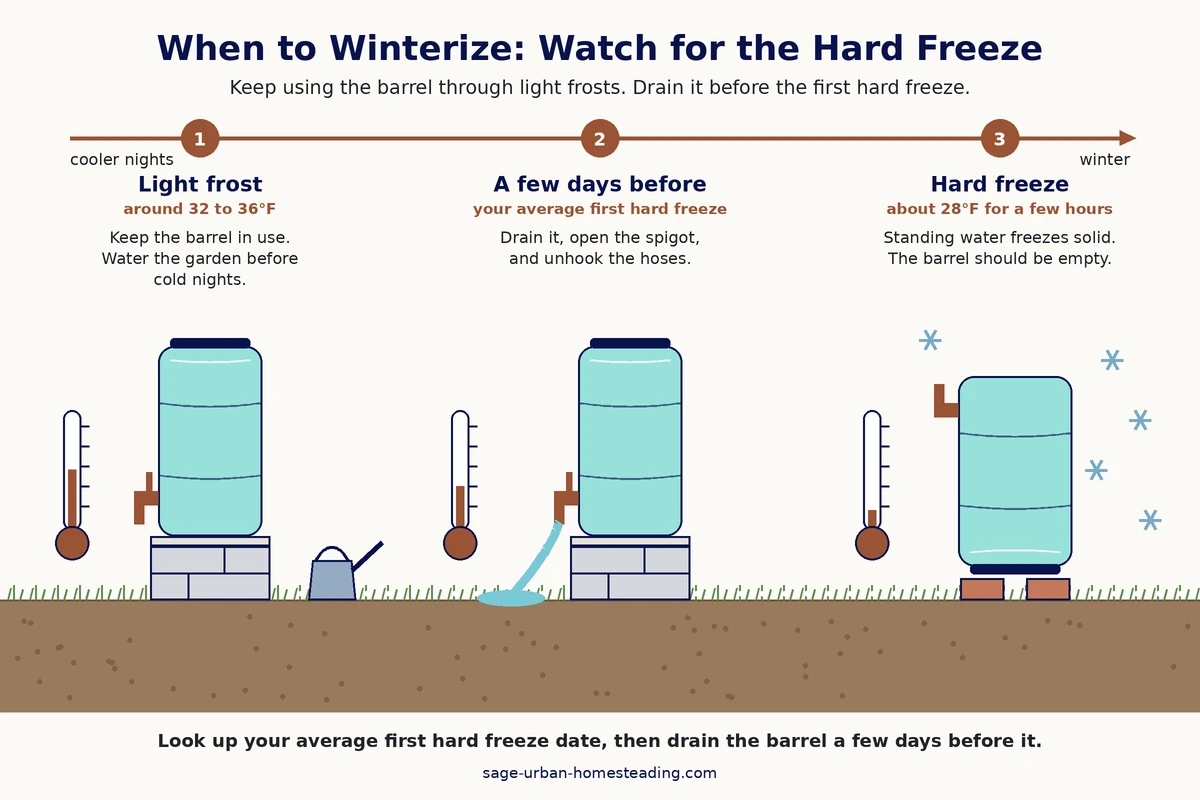 Keep using your barrel through light frosts. Drain it a few days before your average first hard freeze.
In central Maryland, the first frost usually arrives in late October or early November, and the first hard freeze tends to come a little later. When we lived inside the Baltimore Beltway, everything came later. The city stayed warmer, and our growing season was about a month longer than it is now.
So your timing depends on where your yard is, not just your state. Look up the average first hard freeze date for your area, the date for 28°F rather than the first frost date, and plan to winterize a few days before it. If you're in the Midwest or Northeast, the free Freeze Date Tool from the Midwestern Regional Climate Center lets you look up your area and choose 28°F. Elsewhere, your local extension office can tell you.
It's easiest to remember to do if you tie it to the routine at the end of your garden season. Once the last tender crops are done and you're putting the hoses away, drain the barrel too.
How to winterize a rain barrel, step by step
This takes less than an hour for one or two barrels, and most of that is waiting for the water to drain.
1. Use or drain the last of the water
The last barrel of the season is still good water. Use it on garlic beds, fall greens, young trees, or perennials you planted this year. They all need a good drink before the ground freezes.
If you can't use it all, drain it through the spigot or a hose onto a lawn or garden bed where it will soak in. Keep it away from your foundation, walkways, and your neighbor's yard. See Rain Barrel Overflow Routing.
Once the water drops below the spigot, the barrel is light enough to tip. Tilt it to pour out the last few inches. Don't try to move a full barrel; a full 55-gallon barrel weighs more than 450 pounds.
2. Open or remove the spigot
We leave our spigots in the open position all winter. That way, no water gets trapped inside the valve, and any drips or melting snow drain right out.
If your spigot screws out easily, you can also remove it and store it indoors. Keep the washer with it in a labeled bag so you're not hunting for it in the spring. Leave the hole open so the barrel can drain, or cover it loosely with tape so bugs don't move in.
A spare spigot like this rain barrel spigot with washers on Amazon (affiliate link) is handy if yours cracks or won't seal. Skip it if your spigot still opens, closes, and doesn't drip. There's no need to replace a part that works.
3. Unhook the hoses
Unhook every hose connected to the barrel: the garden hose, any soaker hose, the overflow hose, and the connecting hoses between barrels. Water left in them can freeze and split them, or crack the fittings they're attached to.
We unhook our connecting hoses every fall. Drain each one by holding one end up high and walking it out, then coil it and store it out of the sun.
4. Clean the barrel while it's empty
An empty barrel is the easiest barrel to clean, so take a few minutes now.
- Rinse out the sludge. Leaves, grit, and pollen settle on the bottom over the summer. A hose and a long brush will loosen most of it.
- Scrub with mild soap if the walls feel slimy, then rinse well.
- Check the screens. Brush them off and replace any that are torn, so they're ready to keep mosquitoes out in spring. See Mosquito-Proof Rain Barrel.
- Look for cracks in the walls, bottom, and around each fitting while you can see them clearly.
If you had a lot of green slime this year, a cleaner barrel in the fall gives you a head start on algae next season. See Preventing Algae in Rain Barrels.
5. Store it upside down, indoors, or covered
The goal is simple: keep rain and snow from collecting inside the barrel again. Pick whichever option fits your barrel and your space.
- Upside down. If your barrel can sit flat that way, flip it over and set it on a couple of bricks or blocks so air moves underneath. This is the easiest choice if your barrel has a flat top.
- Indoors. A shed, garage, or basement protects the plastic from cold and winter sun. It's nice if you have the room, but it isn't required.
- Upright and covered. If your barrel is rounded on top like ours, or you don't have space inside, leave it upright. Keep the lid on snugly, and cover the inlet with a board or a piece of plastic so rain can't refill it. The open spigot lets out any drips that sneak inside.
An empty barrel is light enough to blow across the yard in a winter storm. If yours stays outside, tie it to a fence post, a stake, or the stand.
You can buy heavy-duty outdoor bungee cords on Amazon (affiliate link). These are handy for strapping an empty barrel to a post or stand. Skip them if you already have rope or a ratchet strap in the garage.
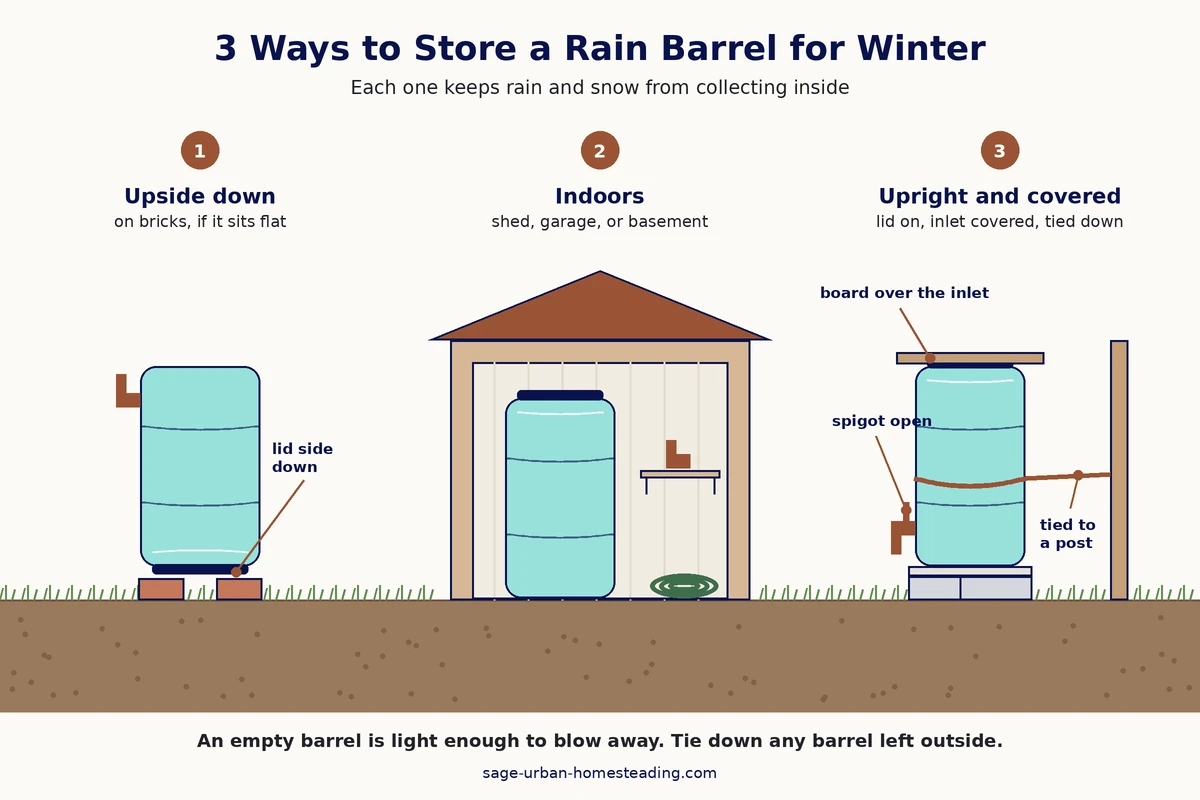 Upside down, indoors, or upright and covered. Any of these works, as long as rain and snow can't collect inside.
Reconnect the downspout so water drains away from the house
This is the step people forget, and it matters more than where the barrel spends the winter. With the barrel gone or disconnected, your downspout may now end in midair, a few feet off the ground. Winter rain and snowmelt will pour straight down against your foundation.
Fix it before the next storm:
- If you cut your downspout for the barrel, add a short section of downspout to reach the ground again, with a connector to join it.
- Add an elbow at the bottom so water turns away from the house.
- Add an extension or splash block that carries the water out onto lawn or a bed that slopes away from the foundation.
- If you use a diverter, switch it to send all the water down the downspout, and drain and cap the hose that fed the barrel. See Downspout Diverter Options.
After the next rain, take a quick look. You want the water landing well out from the house and soaking in, not pooling by the walls or running toward a walkway. See Rain Barrel Overflow Routing.
On our shed, we do the same thing at a bigger scale. We drain the 200-gallon tanks and turn a lever on our first flush kit so the rain goes down the downspout and bypasses the tanks completely until spring.
An expandable extension like this flexible downspout extension on Amazon (affiliate link) is easy to put on in fall and pull off in spring. Skip it if you have a leftover piece of downspout and an elbow; they do the same job.
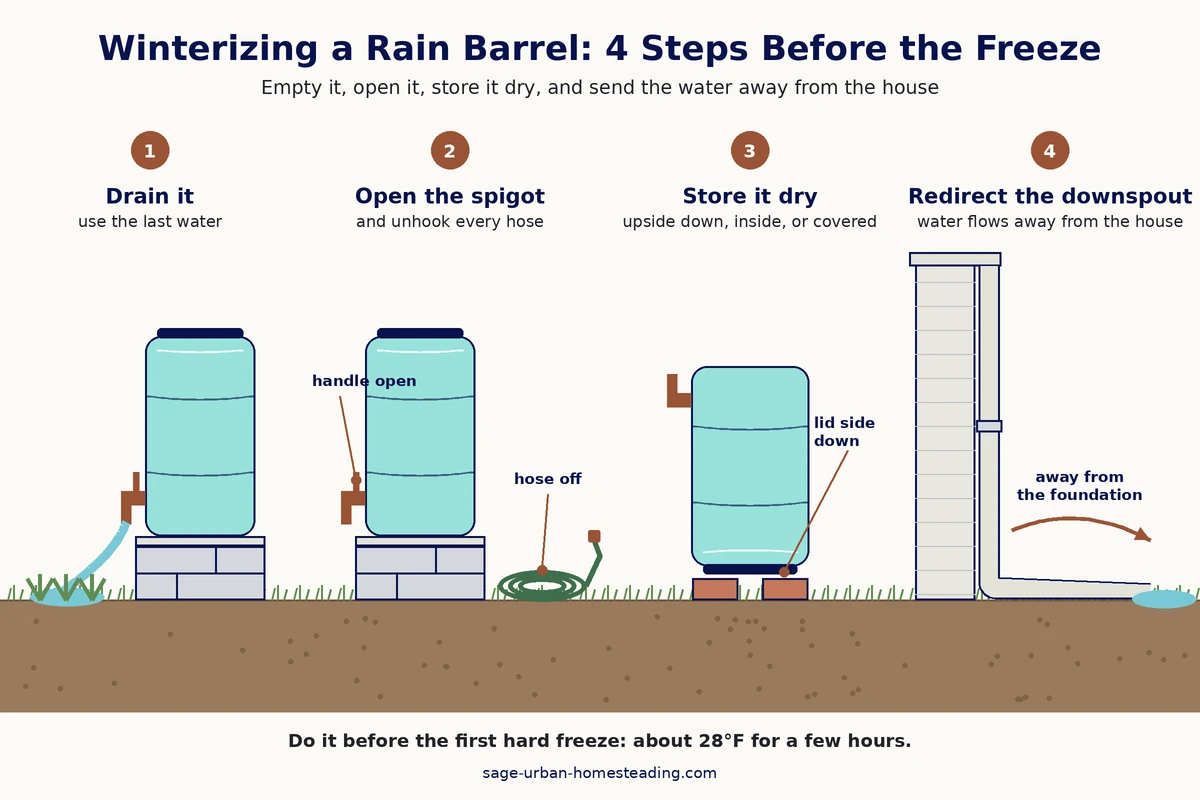 Drain it, open the spigot and unhook the hoses, store it so it stays dry, and send the downspout water away from your house.
First flush and diverter care for winter
A first flush diverter holds back the dirtiest water from the start of each rain, and that water sits in a pipe or chamber. In winter, that's just one more container that can freeze and crack.
On our 200-gallon rain tanks, we drain the tanks every winter and turn a lever on the first flush kit to send the rain down the downspout instead. Here's what to do with yours:
- Drain the chamber. Open the cap or valve at the bottom and let all the water out.
- Clean out the gunk while it's open. It's usually full of grit and leaf bits by fall.
- Remove it or leave it open. If it comes off easily, store it inside. If not, leave the drain open so it can't hold water.
- Switch it to the downspout so rain bypasses the first flush and the barrel until spring. Some kits, like ours, have a lever for this.
See the First Flush Diverter Basics for more details.
If you use a downspout diverter instead, check whether it has a winter setting. Many can be flipped so all the water goes down the downspout. Drain the fill hose and store it with your other hoses. See Downspout Diverter Options.
Can a rain barrel stay in use through winter?
In a mild climate where it rarely freezes, and only for a few hours at a time, some people keep their barrels running all year. It can work, but it comes with real risks:
- A surprise cold night can freeze the spigot or a hose, even if the barrel itself is fine.
- Ice can plug the overflow, so the next rain spills over the top or backs up the downspout.
- A full barrel has no room for ice to expand, so it's more likely to crack than a half-full one.
- Thin plastic is a gamble in any freeze.
If you want to try it, keep the barrel no more than half full, unhook the hoses on cold nights, and drain it before any forecast hard freeze. Check the overflow after each cold snap. And plan for the days you'll need to run out and empty it.
In central Maryland, I wouldn't bother. Most of the water you'd collect falls when the garden doesn't need it, and the risk to the barrel isn't worth it. If you're in an area like ours, empty it, and enjoy a season of rest.
Planning what to start next spring? My free 2-page guide, Which Urban Homestead System Should You Start First?, helps you pick the system that fits your space and your time, so you can use the quiet months to plan instead of guess.
Setting it back up in spring
Wait until after your last hard freeze, then put everything back together:
- Check for damage. Look for cracks, warping, and worn washers, especially on the bottom and around fittings.
- Reattach the spigot and hoses, with fresh washers if the old ones are flat or cracked.
- Put the screens back on and make sure every opening is covered. See Mosquito-Proof Rain Barrel.
- Reconnect the downspout or diverter, and the first flush if you use one.
- Test it. Fill it partway with a hose or let the first rain do it, then check for drips around the spigot, seams, and fittings.
If a barrel did crack over the winter, it's not a failure on your part. It tells you what that barrel can handle. Replace it with a heavier one, and you'll have a better system than you started with. See How to Set Up a Rain Barrel.
Ready to plan more than one system? The Small-Space Self-Sufficiency Starter Map helps you choose your first 3 homestead systems and decide what to start now, what to start next, and what to save for later, with a 30-day action map.
FAQ about winterizing rain barrels
My rain barrel already froze. Is it ruined?
My rain barrel already froze. Is it ruined?
Not necessarily. Let it thaw on its own, then drain it and look closely at the bottom, the seams, and around each fitting. Don't try to chip or melt the ice out; that's how plastic gets cracked.
If you can't see any damage, fill it partway in spring and watch for drips before you count on it. If it did crack, replace it with a heavier barrel. That's what we did after ours split. See How to Set Up a Rain Barrel.
Can I put antifreeze or salt in my rain barrel?
Can I put antifreeze or salt in my rain barrel?
No. Whatever goes in the barrel ends up on your garden and in your soil. Antifreeze is toxic to people, pets, and wildlife, and salt damages soil and plants. Draining the barrel is the only protection it needs.
Do I need to winterize a heavy-duty barrel or a large tank?
Do I need to winterize a heavy-duty barrel or a large tank?
Yes. Thick plastic holds up to ice better, but the spigot, fittings, hoses, and first flush can still freeze and crack.We drain our 200-gallon rain tanks every winter and turn the lever on our first flush kit so the rain goes down the downspout until spring. See First Flush Diverter Basics.
Do I winterize linked rain barrels differently?
Do I winterize linked rain barrels differently?
Not really. Drain every barrel, not just the one with the spigot, and take off the connecting hoses so no water sits in them. We unhook ours every fall. See Rain Barrel Overflow Routing.
Winterizing checklist
Here's everything on this page in one place. Run through it once in the fall, before your first hard freeze, and again in the spring.
In the fall
- Use the last of the water on fall plantings, or drain it where it will soak in.
- Tip the barrel to pour out the last few inches.
- Leave the spigot open, or remove it and store it with its washer.
- Unhook and drain every hose: garden, soaker, overflow, and connecting hoses.
- Rinse out the sludge, brush the screens, and look for cracks.
- Store the barrel upside down, indoors, or upright with the lid on and the inlet covered.
- Tie down any empty barrel that stays outside.
At the downspout
- Reconnect or extend the downspout to the ground.
- Add an elbow and an extension or splash block.
- Make sure the water lands away from the foundation and soaks in.
- Switch any diverter to send water down the downspout.
- Drain the first flush, and switch it to the downspout or unhook it.
In the spring
- Wait until after your last hard freeze.
- Check the barrel and fittings for cracks and worn washers.
- Reattach the spigot, hoses, screens, and diverter or first flush.
- Fill it partway and check for leaks.

Amy DeVries helps beginner urban homesteaders learn by doing. A lifelong gardener, she has grown food in spaces that expanded to 16 raised beds, patio containers, dwarf fruit and nut trees, and gravity-fed rainwater systems. She shares practical lessons shaped by real experience. Amy homeschools her children and teaches the same hands-on skills that guide her work.
You might like these
Rain Barrels: A Beginner's Guide
How to choose, place, and set up your first rain barrel, with real lessons from our own rain barrels and links to every next step.
Rain Barrel Stand Designs for Real Yards and Setups
Choose the best rain barrel stand designs for your yard, barrel, and skill level, with practical guidance on height, base prep, materials, and safety.
Downspout Diverter Options: What Happens When It Overflows
Compare downspout diverter options by what they do when your rain barrel fills up, and what each setup can realistically water.


More Information
Disclosure
All information found on this website is editorial in nature and intended to motivate and inspire rather than be used as medical advice or legal advice.
As an Amazon Associate, I earn from qualifying purchases. I also use Google Ads and cookies as described in the Privacy Policy.
Thank you for your support!
By Amy DeVries, Copyright © 2011-2026 Sage-Urban-Homesteading.com All rights reserved.
