FYI: This website contains affiliate links. As an Amazon Associate I earn from qualifying purchases.
- Home
- Water Collection
- First Flush Diverter
First Flush Diverter Basics: When It's Worth It and How It Works
By Amy DeVries
Short answer: For first flush diverter basics, you should know it is a pipe that catches the first, dirtiest water off your roof, along with the dust, pollen, leaf bits, and bird droppings it carries, before the rest of the rain goes to your barrel. It's a helpful upgrade if your roof is under trees or your barrel keeps filling with grit, but it isn't a first step. For most first rain barrels, a good screen on the lid is enough.
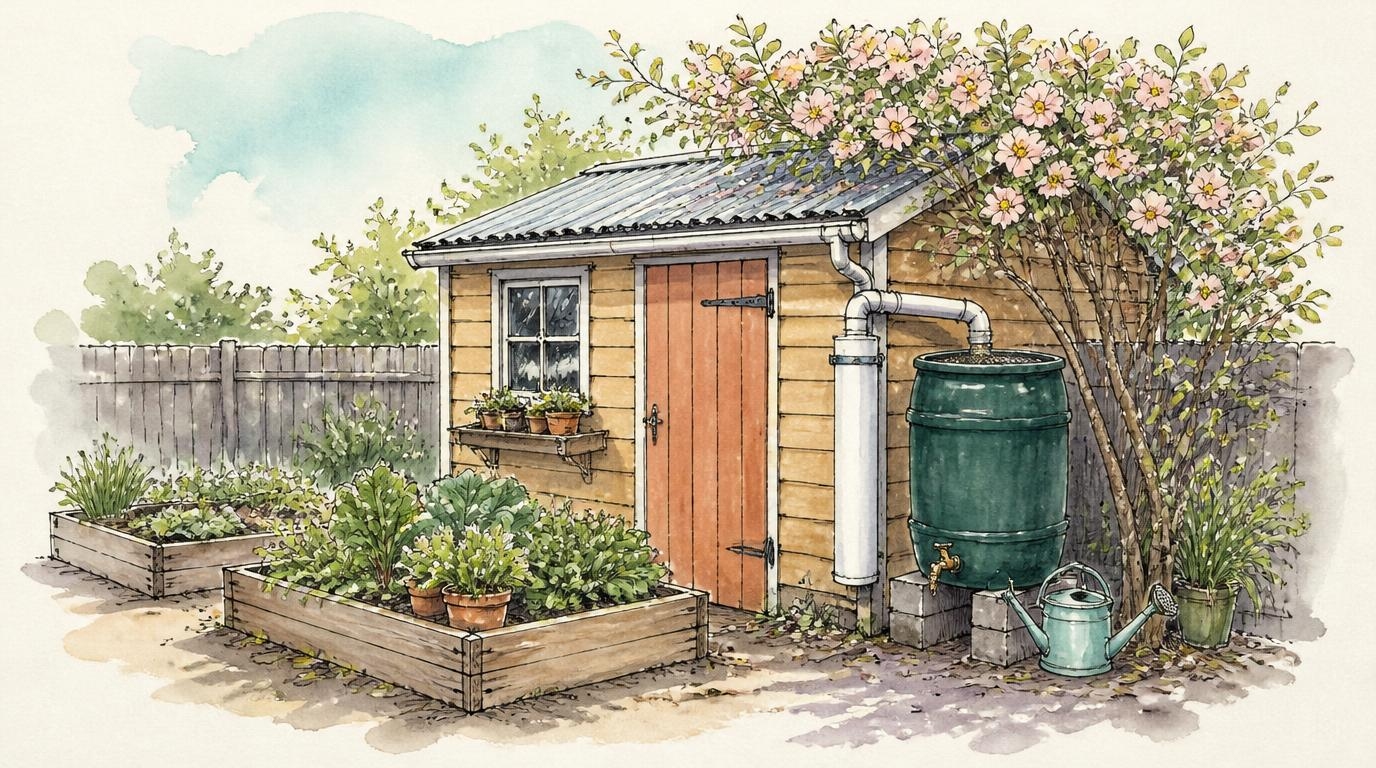 A first flush catches the dirtiest water off the roof before it reaches the barrel.
Our first rain barrels didn't have a first flush. They were open downspouts over a screen, and they worked. The screen caught the leaves, we rinsed out the sludge now and then, and the garden got its water.
Today our 200-gallon tanks by the metal shed roof do use a first flush. The shed sits under a plant that's best described as a large shrub or a small tree, and it goes through cycles of dropping petals and leaves all over the roof. For that roof, the first flush earns its keep.
So if you've seen first flush diverters on every rain barrel setup online and wondered if you skipped a step, you didn't.
Let's cover the first first flush diverter basics. A first flush is an upgrade that solves a specific problem: dirty water from a dirty roof. This page will help you tell whether you have that problem, and if you do, how to add one without overthinking it.
What is a first flush diverter?
A first flush diverter is a short section of pipe, usually a standpipe, that fills up with the first water off your roof at the start of each rain. Once it's full, the rest of the rain goes on to your barrel. The dirty water stays behind and drains out slowly through a small valve at the bottom.
It works because the first water off a roof carries most of what has settled there since the last rain:
- Dust and grit from roads, roofing, and nearby construction
- Pollen, which can coat a roof yellow in spring
- Leaf bits, petals, and seeds small enough to slip past a gutter guard
- Bird droppings, especially if birds like to perch on your roofline
The longer it's been since the last rain, the more there is to wash off.
A first flush diverter isn't the same thing as a downspout diverter. A downspout diverter sends water from the downspout into your barrel, and many send it back down the downspout once the barrel is full. A first flush throws away the first bit of each rain before it gets to the barrel. Some systems use both, and they can work together. See the Downspout Diverter Options.
How a first flush diverter works
Most store-bought first flush diverters use a floating ball and a narrow seat. It sounds technical, but it's simple once you picture it:
- The first water fills the pipe. Rain runs down the downspout and drops straight into the standpipe, carrying the dust, pollen, and grit with it. The ball floats on top of that rising water.
- The ball floats up and seals. When the pipe is full, the ball reaches a narrow seat near the top and plugs it. The dirty water is now trapped below.
- Clean water flows on to the barrel. With the pipe sealed, the rest of the rain goes past it, through a short pipe or a tee, and into your barrel.
- The pipe drains slowly. A small valve or drip hole at the bottom lets the trapped water seep out over time. When it's empty, the ball drops back down, and the pipe is ready to catch the next rain.
Some simple DIY versions skip the ball. The pipe fills, and once it's full the water simply backs up and spills over into the barrel. Those work too, but a little dirty water can mix back in at the top, so the ball version gives a cleaner cut-off.
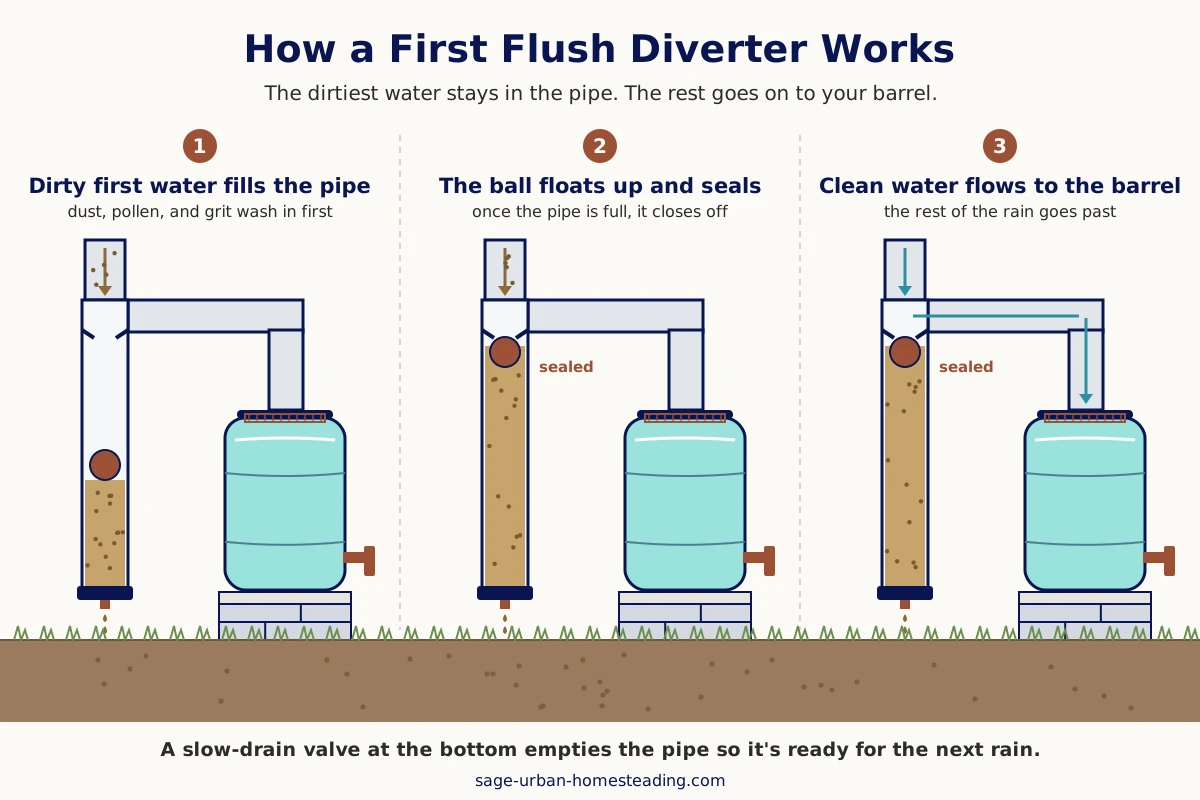 The dirty first water fills the pipe, the ball seals it off, and the rest of the rain goes on to the barrel.
Do you need a first flush, or is a screen enough?
This is the question that matters, so here's the honest version: most beginners don't need a first flush to start.
A screen and a first flush do different jobs. A screen on your barrel's lid catches the big stuff, like leaves, twigs, and bugs. A first flush catches the fine stuff that a screen lets through, the dust, pollen, and grit that settle into sludge at the bottom of the barrel. If the big stuff is your only problem, a screen solves it.
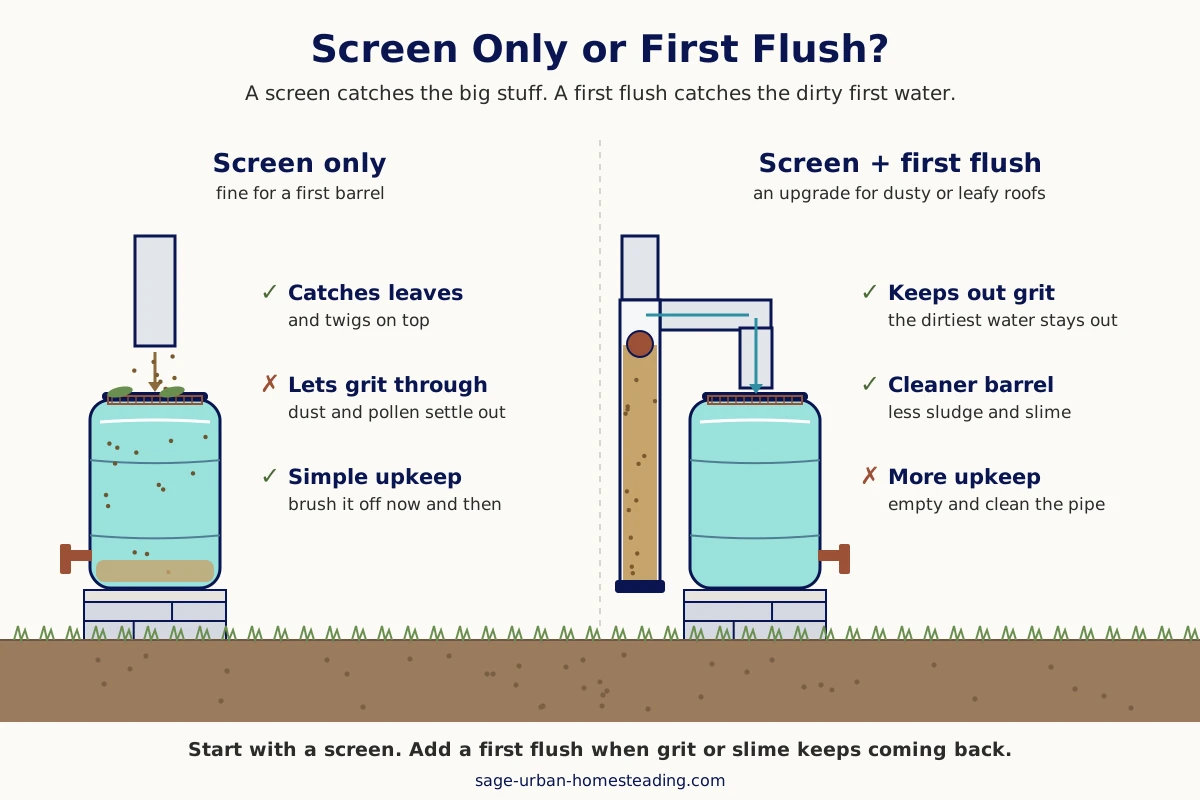 A screen catches the big stuff. A first flush also keeps out the fine grit, but it's one more thing to clean.
A screen is probably enough if…
- This is your first rain barrel, and you're still learning how it fits your routine.
- Your roof is out in the open, with no trees hanging over it.
- You use the water within a few weeks, so it doesn't sit long enough for sludge to matter.
- You don't mind rinsing the barrel out once or twice a year.
- You're watering the garden with a can or a hose, not running a drip line with tiny emitters.
That was us with our first barrels. Start here, and give it a season.
You can buy a fine mesh barrel inlet screen on Amazon (affiliate link). If your barrel came without a screen, or the old one is torn, this is the upgrade to make first. It also keeps mosquitoes out. Skip it if your barrel's screen is still whole and fits snugly.
A first flush is worth adding if…
- Your roof sits under a tree or a big shrub, like ours does.
- Your screen clogs after almost every rain.
- You find a thick layer of sludge in the barrel, or the water turns green or smells.
- You live near a busy road, a dirt lot, or construction, or your roof turns yellow with pollen in spring.
- Birds like to perch on your roofline.
- You're collecting into big tanks that are hard to tip and rinse out.
- You're feeding a drip line, and grit keeps clogging the emitters.
If you're nodding along to one or two of these, a first flush will likely save you more cleaning than it adds. If none of them fit, keep your money and your Saturday. See How to Set Up a Rain Barrel.
Still figuring out where to start? My free 2-page guide, Which Urban Homestead System Should You Start First?, helps you pick the one system that fits your space and your time, so you don't spend money on upgrades before you need them.
Where a first flush goes in your system
A first flush sits between the downspout and the barrel. Water comes off the roof, into the gutter, down the downspout, and into the first flush. Only after the first flush fills does water move on through the barrel's screen and into the barrel. From there, the overflow carries extra water away when the barrel is full.
A few placement tips:
- Mount it on the wall. A full pipe is heavier than it looks. Strap it to the wall or a post so the weight doesn't pull on the gutter or the downspout.
- Leave room under the cap. You'll be opening the bottom cap to clean it, so keep it a few inches off the ground with space to get your hands and a bucket under it.
- Send the drip somewhere useful. The slow drain lets out dirty water a little at a time. Let it drip onto gravel or a bed of ornamentals, not against your foundation or onto a walkway. See Rain Barrel Overflow Routing.
- Keep a screen in the system. The first flush doesn't replace it. The screen can sit on the barrel lid, or on top of the first flush like ours, where it stops leaves and twigs before they reach the pipe.
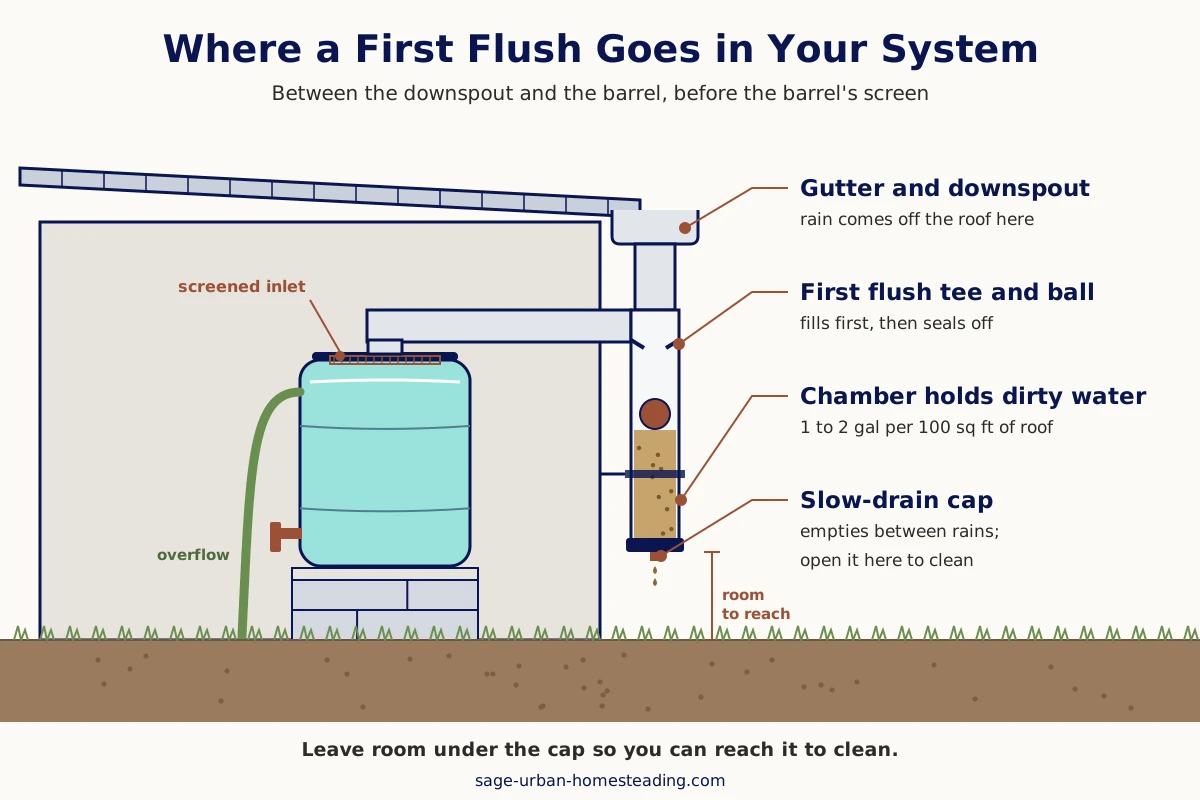 The first flush goes between the downspout and the barrel. Leave room under the cap so you can reach it to clean.
How big should a first flush be?
The usual guideline is to divert about 1 to 2 gallons of water for every 100 square feet of roof that drains into that downspout. That comes from the Texas Water Development Board's Texas Manual on Rainwater Harvesting, one of the most widely used guides on home rainwater collection.
To figure out yours:
- Measure the roof area that drains to that downspout. Measure the length and width of that part of the roof from the ground, its footprint. You don't need to climb up and measure the slope.
- Multiply length by width to get square feet.
- Divide by 100, then multiply by 1 for a clean, open roof or by 2 for a roof under trees, near birds, or in an area with long dry spells.
For example, a 10-by-12-foot shed roof is 120 square feet, so you'd divert about 1.2 to 2.4 gallons.
First flush size calculator
Measure the part of the roof that drains to this downspout from the ground. You don't need to climb up.
Enter your roof size to see how much to divert.
Based on the Texas Water Development Board guideline of about 1 to 2 gallons per 100 square feet of roof. Close enough is fine. A little more or less still works.
If you're building your own, the same manual gives a handy pipe conversion. In 3-inch pipe, about 33 inches of length holds 1 gallon. In 4-inch pipe, it's about 18 inches.
Don't stress about getting it exact. If your first flush is a little small, a bit more grit reaches the barrel. If it's a little big, you lose a little more water at the start of each rain. Either way, the system still works. Most store-bought kits are sized for typical small roofs, and some let you add pipe length to divert more.
Our shed roof is about 170 square feet, and our kit holds about 1 gallon.
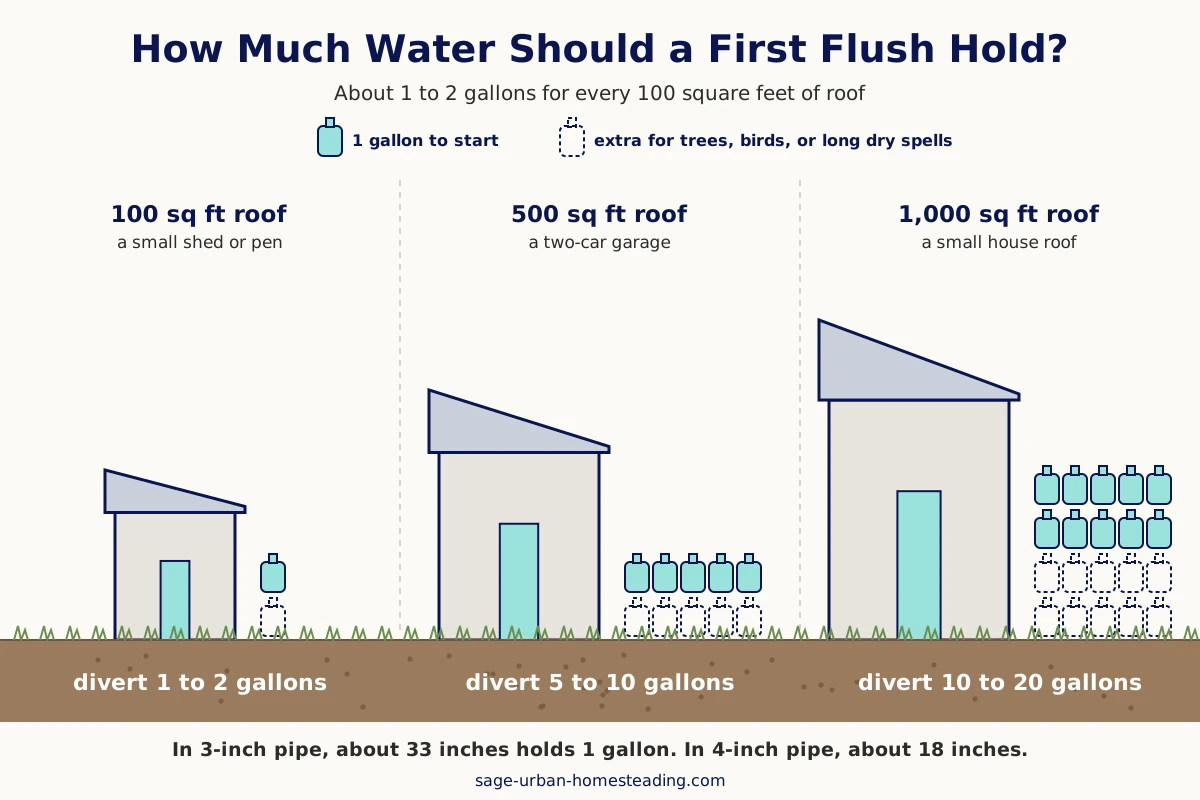 About 1 gallon per 100 square feet of roof is a good start. Go toward 2 if your roof is under trees.
Store-bought kit or DIY?
Both work. The right choice depends on whether you'd rather spend a little more money or a little more time.
Store-bought kit
A kit comes with the ball, the seat, a slow-drain valve, and a screw-off cap, already sized to fit together. You add pipe and connect it to your downspout. This is what we did for our shed tanks, and it's the easier route if you don't want to hunt down fittings or test for leaks.
You can find the first flush diverter kit and the downspout leaf filter we use on Amazon (affiliate links). This is the exact kit on our 200-gallon shed tanks. It's held up without clogs, slow draining, overflow, or smell. Skip it if you're on your first barrel and your screen isn't clogging, because you probably don't need a first flush yet. Also check that it fits your downspout or pipe size before you buy.
Some kits, like ours, have a leaf screen built into the top. Leaves stop on the screen, and the fine grit washes down into the pipe. If yours doesn't have one, keep the screen on your barrel lid.
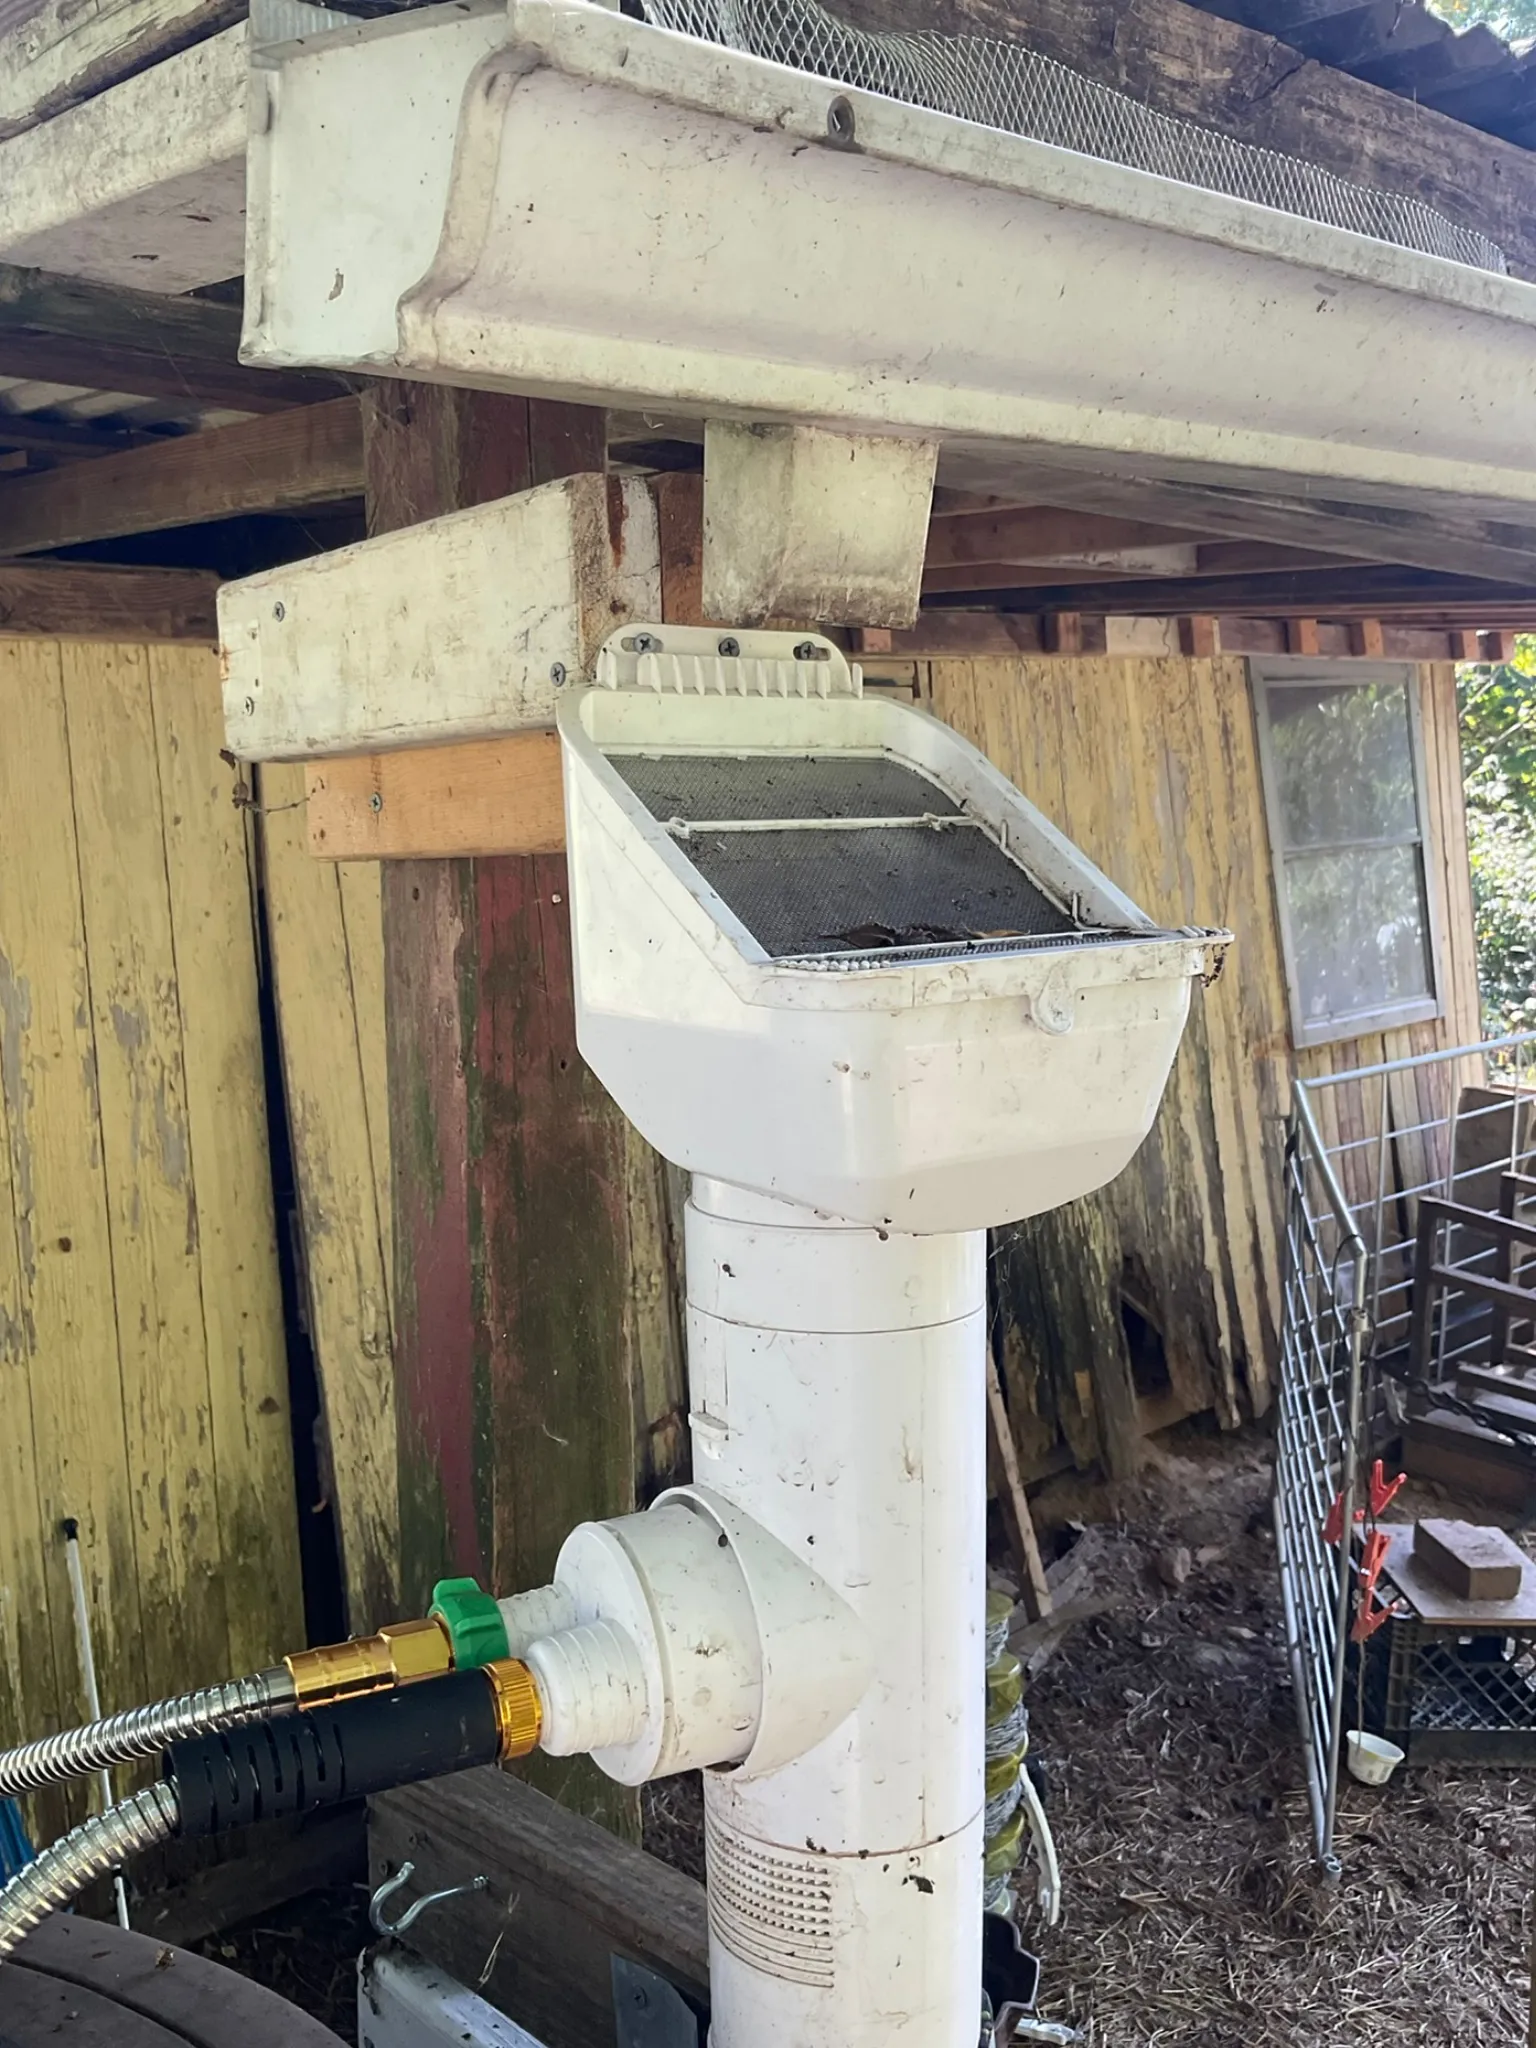 Our first flush kit has a leaf screen built into the top. Leaves stop here, and the fine grit settles in the pipe below.
DIY standpipe
The simplest DIY version is a length of PVC pipe with a tee at the top and a screw-on cap at the bottom, sometimes called a poor man's roof washer. Drill a tiny hole in the cap, or leave the cap slightly loose, so it drains slowly between rains. Size the pipe length with the numbers above.
DIY makes sense if you already have PVC pieces around, you like small builds, or you need an odd size that kits don't come in. It's not the cheaper choice if you're buying every fitting new, and it takes a little trial and error to get a drain that's slow enough to work but fast enough to empty between storms.
The slow-drain valve, and how often to clean it
The slow drain is what makes a first flush reset itself. It's a small valve, drip hole, or filter at the bottom of the pipe that lets the dirty water seep out over several hours after a rain. Once the pipe is empty, it's ready to catch the next first flush.
The catch is that everything the first flush catches ends up in the bottom of that pipe. If you don't clean it out, the gunk builds up, the drain clogs, and the pipe stays full. A full pipe can't catch anything, so dirty water goes straight to the barrel again.
How often to clean it
We clean ours about once a month, or sooner when it needs it. That's more often than you might need, because of the shrub over our shed roof. When it's in a petal or leaf-dropping cycle, the first flush fills with debris faster.
Some guides, like the Texas manual, say to clean a first flush out after every rain. That's a good habit if your roof is very dirty, but most backyard setups can go longer. A good rule of thumb:
- Under trees or in pollen season: check it every few weeks, or after any big storm.
- Open roof, mild seasons: check it every month or two.
- Anytime: if the pipe is still full a day after the rain stops, the drain is clogged. Clean it now.
So far, cleaning on that schedule plus keeping an eye on it after storms has kept us from having any clogs, slow draining, overflow, or smell. I'll be honest, though: it's still one more thing to clean and maintain. That's the real cost of a first flush, and it's why I don't recommend one until it solves a problem you actually have.
How to clean a first flush
- Wait until it's mostly drained, or set a bucket underneath to catch the water.
- Unscrew the bottom cap. Expect a rush of dark, gritty water and a plug of leaf bits.
- Rinse the pipe from the top with a hose until the water runs clear.
- Clean the slow-drain valve or filter. Rinse it, and poke out any grit with a toothpick or a small brush.
- Check the ball and seat. Make sure the ball moves freely and the seat isn't caked with grime.
- Screw the cap back on snugly, without cross-threading it.
The gunk itself is fine to dump on a compost pile or under shrubs, away from your vegetables.
You can buy a long-handled bottle brush on Amazon (affiliate link). It's handy for scrubbing slime off the inside of the pipe and the seat. Skip it if a strong hose rinse gets yours clean, or if you already have a bottle brush in the kitchen you can retire to the garden.
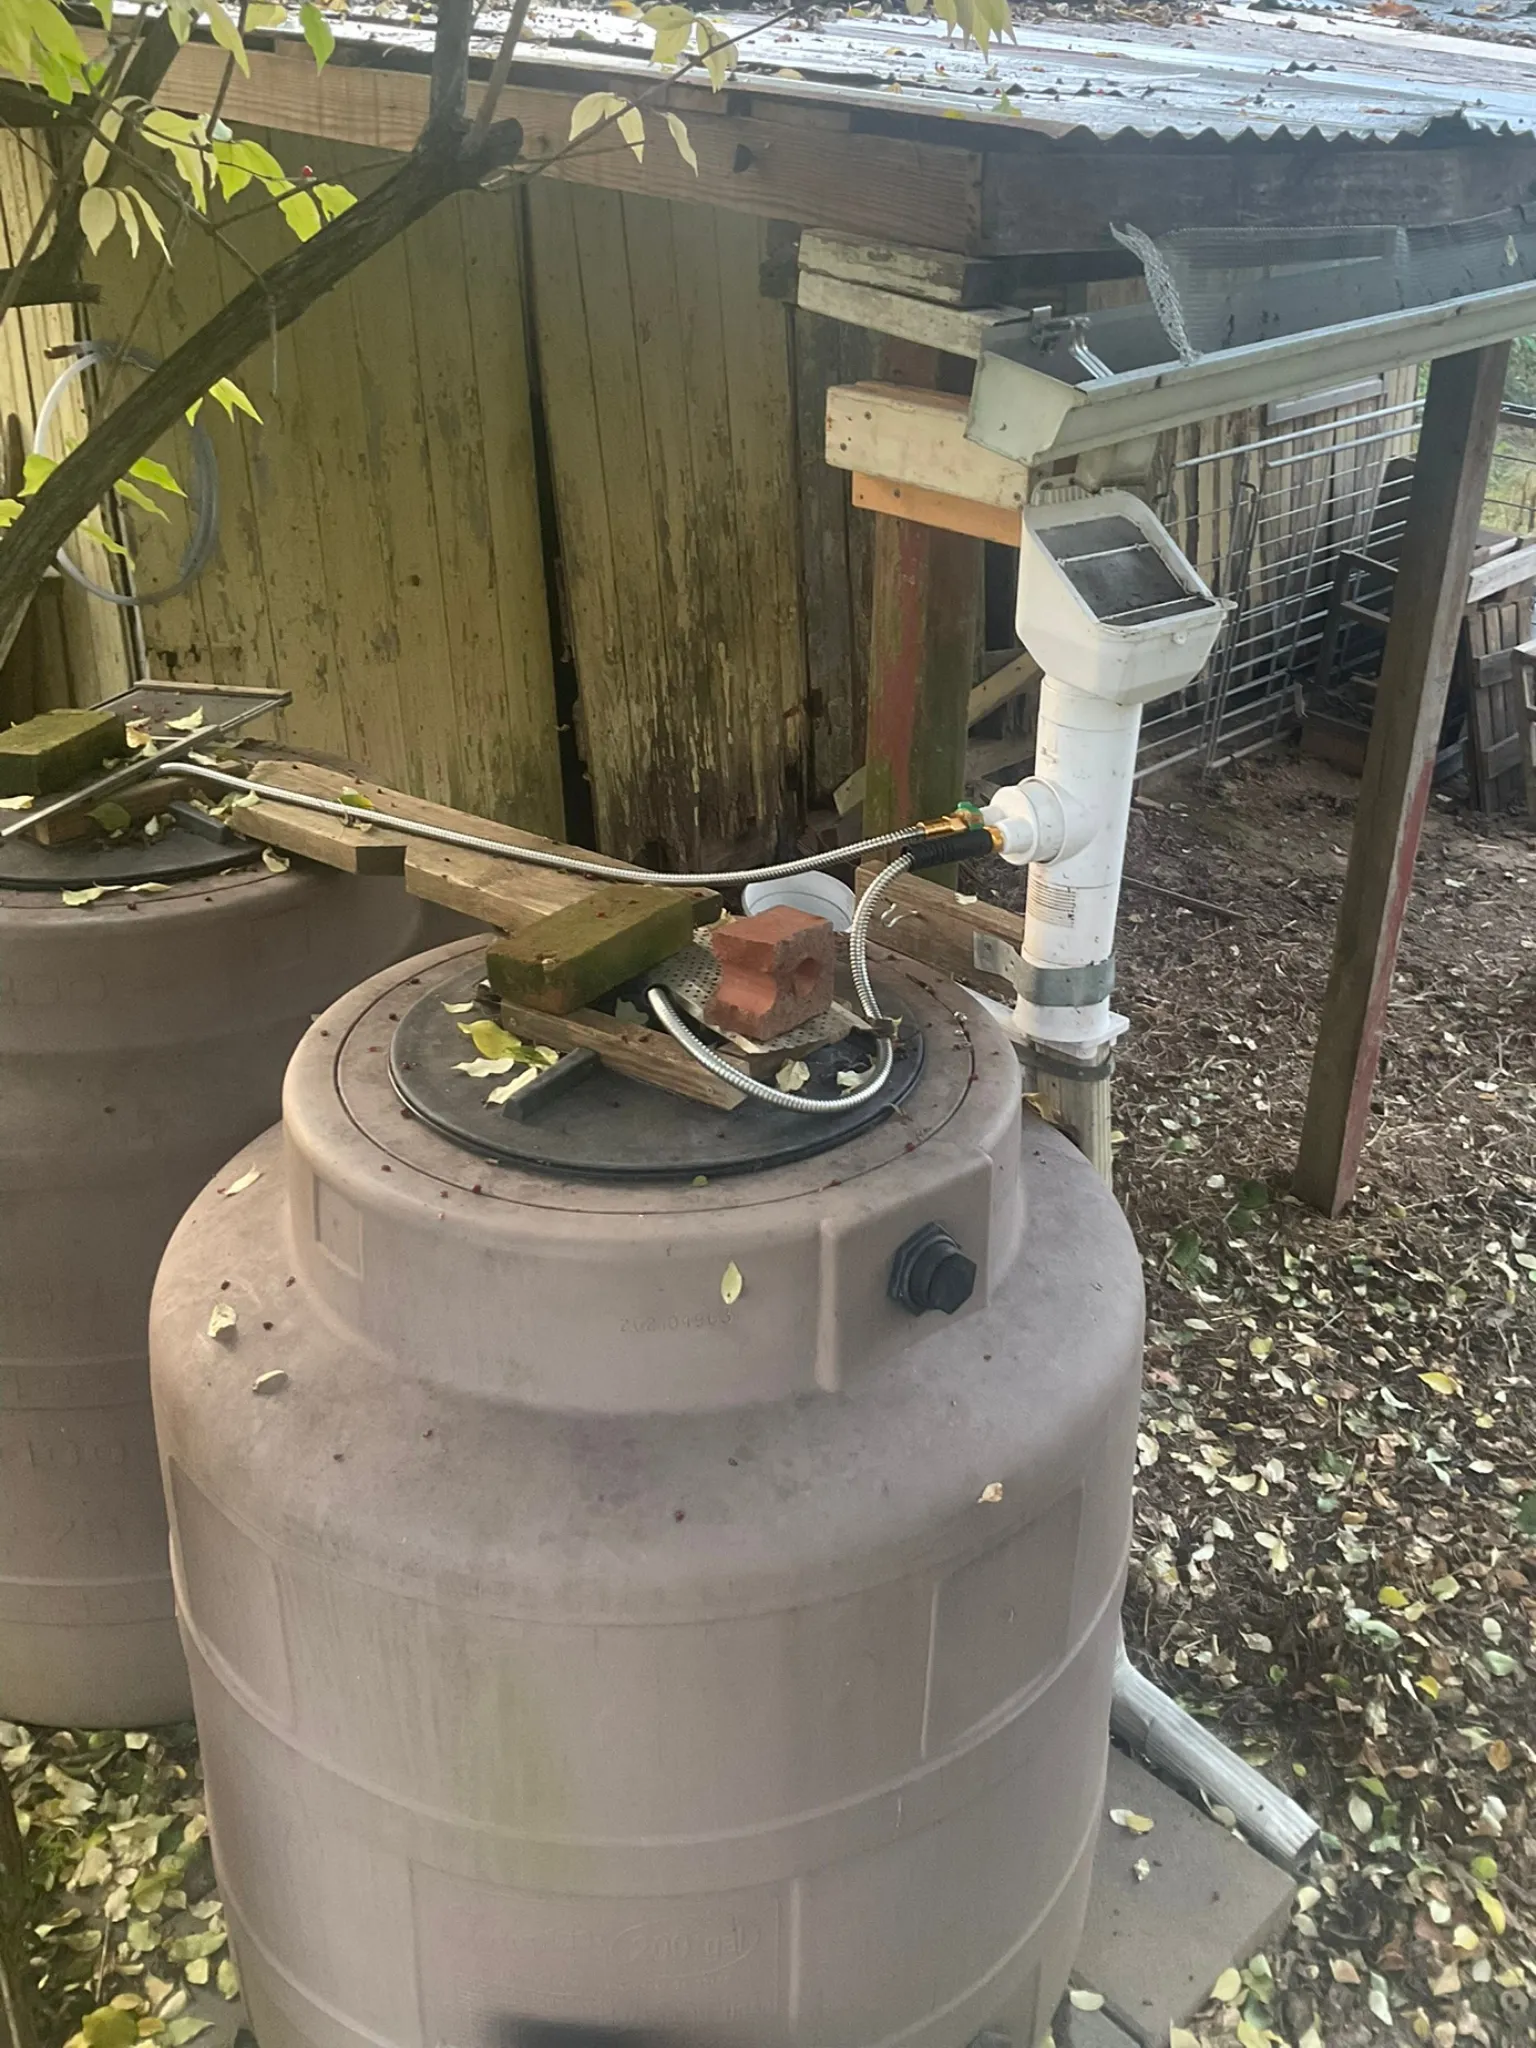 Our shed tanks sit under a tree that drops leaves and petals in cycles, so we clean the first flush about once a month.The bricks are a temporary solution to help hold the mesh frame in place.
How a first flush helps with mosquitoes, algae, and clogged screens
A first flush doesn't fix these problems on its own, but it takes away a lot of what feeds them.
- Clogged screens. Fine grit and petal bits that would mat down on your screen get caught in the pipe instead. A screen that stays open keeps water flowing in during a downpour instead of spilling over the top.
- Algae. Algae needs light and food. A dark, opaque barrel blocks the light, and a first flush cuts down on the dust, pollen, and droppings that feed it. See Preventing Algae in Rain Barrels.
- Mosquitoes. Less sludge in the barrel means fewer places for larvae to hide and feed, and a screen that isn't torn or clogged keeps mosquitoes from getting in at all. See Mosquito-Proof Rain Barrel.
One thing to watch: The first flush pipe holds water, too. A working slow drain empties it within a day, long before mosquitoes can finish growing, which takes about a week. If your drain clogs and the pipe sits full for days, clean it out. That's one more reason to check it after a big storm.
Roof material matters more than a first flush
A first flush catches dirt that washes off a roof. It can't catch what's dissolved in the water, or what the roof itself releases.
That's why we don't collect from our house's asphalt shingle roof anymore. Many asphalt shingles are made to resist the dark algae streaks you see on older roofs. They do it with special granules that slowly release copper or zinc every time the roof gets wet. That's great for the roof, but those treatments are meant to stop things from growing, and I didn't want that water going on my garden beds.
Now we only collect from the metal roof on our shed, which is closer to the garden and the animals anyway.
You don't have to make the same choice. Many people water ornamentals with shingle-roof water and feel fine about it. But if you're deciding which roof to collect from, here's how I'd think about it:
- Metal roofs are usually the best choice for garden water. They shed debris easily, and the first flush has less to catch.
- Asphalt shingles are common and fine for many uses, but if you want water for food crops, check whether your shingles are labeled algae-resistant. If you're not sure, use that water on flowers and shrubs.
- Treated wood shakes, or roofs with copper or zinc strips are best kept off your vegetable beds.
- A small roof you control, like a shed, a pen, or a lean-to, is often the easiest place to start. You know what's on it, and the downspout is usually right where you need it.
If your only roof option is one you're unsure about, a first flush still helps with the dirt, and it's still worth using that water on ornamentals. For everyday use, keep rain barrel water for the garden. In an emergency, you can treat it the way you'd treat stream water when camping: filter it, then boil it. Boiling kills germs but won't remove chemicals from roofing, so your cleanest roof, like a metal one, is the best one to draw from.
First flush diverter care in winter
A first flush is just a pipe full of standing water, and in freezing weather that water can split the pipe or crack the cap.
Every winter, we drain our rain tanks and turn a lever on our first flush kit so the rain goes down the downspout instead, bypassing the tanks completely until spring. No unhooking needed. To winterize yours:
- Open the cap and drain it. Clean out the fall gunk while you're there.
- Switch it to the downspout. If your kit has a lever like ours, turn it so rain skips the first flush and the barrel. If not, unhook it, or leave the cap off so it can't hold water.
- Check where the water goes. Winter rain and snowmelt should land well away from the house.
- Switch it back in spring, after your last hard freeze, and check the ball, seat, and slow drain before the first rain.
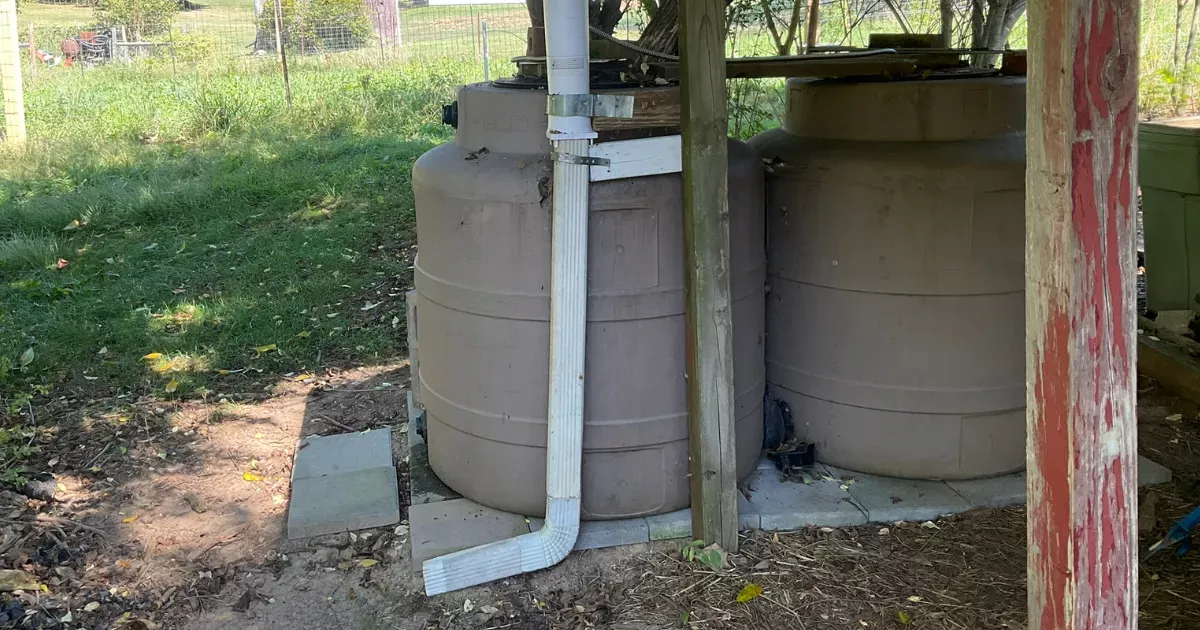 Our winter setup. We turn a lever on the first flush kit, and the rain goes down the downspout and away from the tanks until spring.
Ready to plan more than one system? The Small-Space Self-Sufficiency Starter Map helps you choose your first 3 homestead systems and decide what to start now, what to start next, and what to save for later, with a 30-day action map.
FAQ for first flush diverter basics
Can I add a first flush to a rain barrel I already have?
Can I add a first flush to a rain barrel I already have?
Yes. Most kits connect to the bottom of a downspout or to a short length of pipe, then feed into your barrel's existing inlet. You may need to shorten the downspout and add a pipe from the first flush to the barrel lid. Your barrel, screen, and stand stay the same.
Can I drink rain barrel water if I have a first flush?
Can I drink rain barrel water if I have a first flush?
Not as it comes out of the barrel. A first flush keeps out a lot of dirt, but it doesn't kill germs or remove anything dissolved from the roof. For everyday drinking, stick with tap or bottled water. In an emergency, treat barrel water like stream water when camping: filter it, then boil or disinfect it. Draw from your cleanest roof, because boiling won't remove chemicals like copper from roofing.
Doesn't a first flush waste water?
Doesn't a first flush waste water?
A little. For a small roof, it's usually a gallon or two per rain, and in a good storm that's a tiny share of what you collect. Let the slow drain drip onto shrubs or a flower bed, and that water still does some good.
Do I need a first flush on every downspout?
Do I need a first flush on every downspout?
Only on the downspouts that feed a barrel, and only where it solves a problem. If one barrel sits under a tree and another doesn't, the tree barrel might be the only one that needs it.
Can I use a first flush with a downspout diverter?
Can I use a first flush with a downspout diverter?
Yes. Put the first flush before the diverter or between the diverter and the barrel, so the barrel only gets water after the first flush has filled. Check your diverter's instructions, since some designs have their own screens. See Downspout Diverter Options.
First flush diverter basics checklist
Here's the page in one place. Use the first part to decide, and the rest once you have one.
Before you buy
- Is your roof under trees, dusty, or a favorite bird perch?
- Does your screen clog, or does sludge build up fast?
- If not, start with a good screen and skip the first flush for now.
- Pick a roof you're comfortable watering your garden with.
Setting it up
- Size it at about 1 to 2 gallons per 100 square feet of roof.
- Put it between the downspout and the barrel, and keep a screen in the system.
- Strap it to a wall or post.
- Leave room under the cap to clean it.
- Let the slow drain drip away from your foundation.
Keeping it working
- Check it every few weeks under trees, every month or two on an open roof.
- Clean the cap, the slow drain, the ball, and the seat.
- If the pipe is still full a day after rain, clean the drain.
- Drain it and switch it to the downspout (or unhook it) before your first hard freeze, and switch it back in spring.

Amy DeVries helps beginner urban homesteaders learn by doing. A lifelong gardener, she has grown food in spaces that expanded to 16 raised beds, patio containers, dwarf fruit and nut trees, and gravity-fed rainwater systems. She shares practical lessons shaped by real experience. Amy homeschools her children and teaches the same hands-on skills that guide her work.
You might like these
Rain Barrels: A Beginner's Guide
How to choose, place, and set up your first rain barrel, with real lessons from our own rain barrels and links to every next step.
Rain Barrel Stand Designs for Real Yards and Setups
Choose the best rain barrel stand designs for your yard, barrel, and skill level, with practical guidance on height, base prep, materials, and safety.
Downspout Diverter Options: What Happens When It Overflows
Compare downspout diverter options by what they do when your rain barrel fills up, and what each setup can realistically water.


More Information
Disclosure
All information found on this website is editorial in nature and intended to motivate and inspire rather than be used as medical advice or legal advice.
As an Amazon Associate, I earn from qualifying purchases. I also use Google Ads and cookies as described in the Privacy Policy.
Thank you for your support!
By Amy DeVries, Copyright © 2011-2026 Sage-Urban-Homesteading.com All rights reserved.
