FYI: This website contains affiliate links. As an Amazon Associate I earn from qualifying purchases.
- Home
- Water Collection
- Gravity Drip Irrigation
Gravity Drip Irrigation Rain Barrels: What Works at Low Pressure
By Amy DeVries
Short answer: Gravity drip irrigation rain barrels work, but they are slow, and that's normal. Each foot of height between the water in your barrel and your garden adds only about 0.43 psi, so even a raised barrel gives a small fraction of the pressure that comes out of your outdoor faucet. What works is gear made for very low pressure: a rain barrel soaker hose, or plain drip line with simple emitters, behind a fine filter, on a short run that's level or downhill. Pressure-compensating emitters, micro-sprayers, and standard hose timers usually aren't worth the money here.
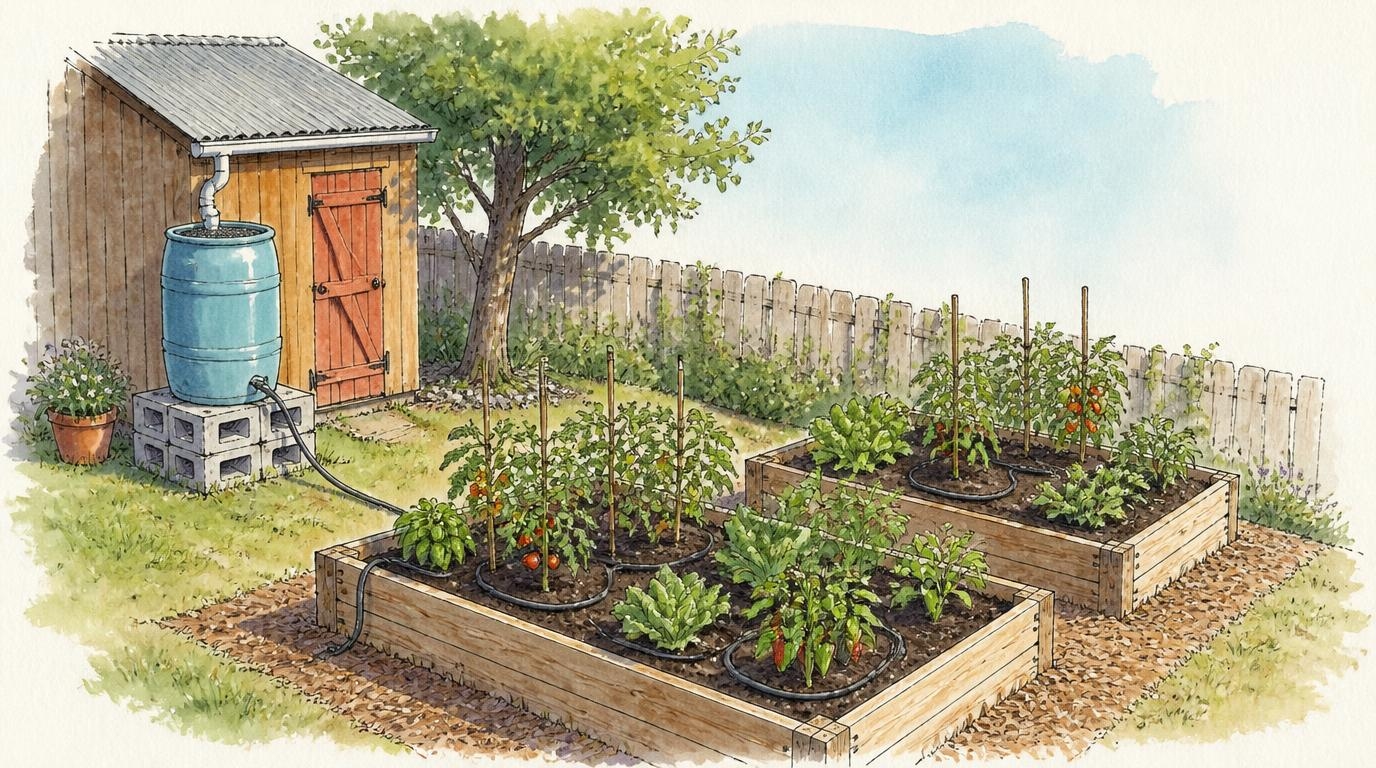 Gravity does the work here. A barrel set a little higher than the beds sends water slowly downhill to the plants.
If you hooked a drip line to your rain barrel and got a slow trickle, or nothing at all at the far end, you didn't do it wrong. A rain barrel has no pump pushing the water. Gravity is the only thing moving it, and gravity is gentle.
That gentleness is the whole story of this page. Most drip irrigation gear is built for faucet pressure, so a lot of it barely works off a barrel. The parts that do work are usually the simpler, cheaper ones.
I'll be honest about where we've been. We've never built anything fancy. For years on our quarter acre lot, our gutters drained to the low end of our sloped yard, so barrel water only reached the lower raised beds by hose. For the beds up the hill, we carried jugs. Today we are on a larger property with 200-gallon rain tanks that collect from a metal shed roof in the middle of everything, close to the garden and the animals, and that central location makes watering much easier.
So this page starts with the smallest version that works, then adds pieces only when they solve a real problem. You might find a soaker hose and a couple of concrete blocks are all you need.
Why rain barrel water is low pressure (and why that's okay)
Water pressure from a barrel comes from one thing: how high the water sits above the place it comes out. Each foot of height adds about 0.43 psi. Put another way, it takes about 2.3 feet of height to make 1 psi.
For comparison, household faucets usually run somewhere around 40 to 60 psi, and most drip irrigation parts are designed for roughly 10 to 25 psi. A full barrel sitting on flat ground gives you about 1 or 2 psi, and that drops toward zero as the barrel empties.
To get faucet-level pressure from gravity, you'd need the water many feet above where you use it. Some homesteaders with a hillside do run gravity-fed water all the way to the house from tanks set well uphill, usually with several stages of filtering. That's a bigger project than watering a garden, though, and for your beds you don't need it. Drip irrigation doesn't really need pressure. It needs water in the line and a path that runs downhill from the barrel. Pressure only decides how fast it comes out.
How much does raising the barrel help?
Raising the barrel helps, and it's the cheapest upgrade on this page. It just helps in small steps.
- Measure from the water, not the spigot. What counts is the height of the water surface in the barrel above the bed where the water comes out. A full barrel pushes harder than a nearly empty one.
- A foot or two makes a real difference at this scale. Going from about 1 psi to about 2 psi doubles your push. You'll notice it.
- Stability matters more than height. A full 55-gallon barrel weighs over 450 pounds. A short, solid stand beats a tall, wobbly one every time. See Rain Barrel Stand Design.
Here's what slow looks like in real numbers. DIG's instructions for its gravity-feed drip kit show that their 1-gallon-per-hour drippers put out only about a third of a gallon per hour when the barrel sits 5 feet above the drip line. So if a label promises a certain flow, expect a lot less from a barrel. Plan on running it longer.
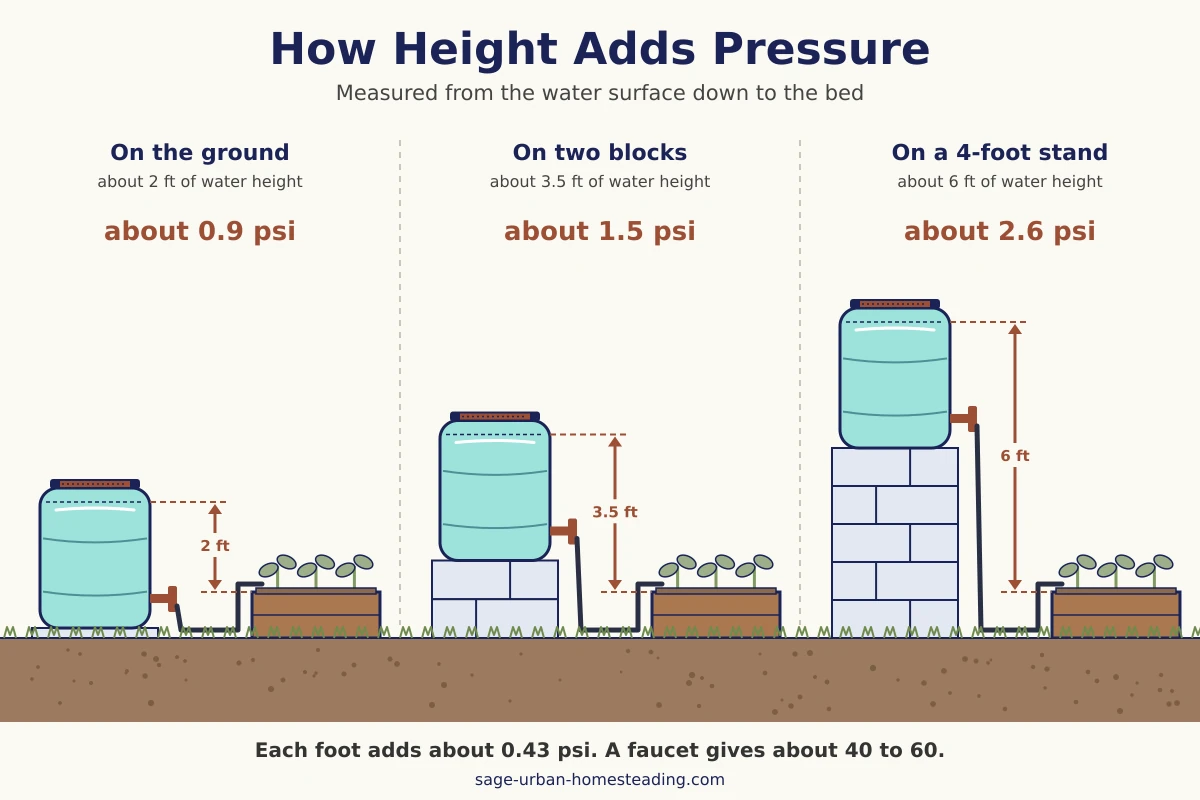 Every foot of height adds about 0.43 psi. Raising the barrel helps, but even a tall stand is still low pressure, so choose gear made for it.
Rain barrel pressure checker
Measure from the water surface in your barrel down to the top of your garden bed.
Each foot adds about 0.43 psi. For comparison, an outdoor faucet gives about 40 to 60. Try the number again for a nearly empty barrel, since pressure drops as it drains.
Start with the smallest version that works
You don't need a full drip system to water from a rain barrel. Here's the order I'd try things in. Stop at the first one that makes watering easy enough for you.
- A watering can at the spigot. Raise the barrel enough to fit a can under the spigot. This is still the simplest, cheapest gravity watering there is. See How to Set Up a Rain Barrel.
- Milk jug slow-drip waterers. Free, and great for a few thirsty plants or a bed the hose can't reach. More below.
- One soaker hose made for rain barrels. Good for one or two beds close to the barrel and level with it or downhill from it.
- Drip line with simple emitters. Worth it when you want water at specific plants, or a soaker hose won't reach.
- A zero-pressure timer. Only once you know the setup works and you're tired of turning the spigot on and off.
A pump is a different project. If your beds are uphill from the barrel or far away, a small pump can solve it, but it adds cost, power, and noise. Try moving the barrel or the bed first.
Our milk jug slow-drip trick
This is the only gravity watering trick we've used, and it's the one I'd recommend to anyone starting out. I picked it up from a homesteading show years ago.
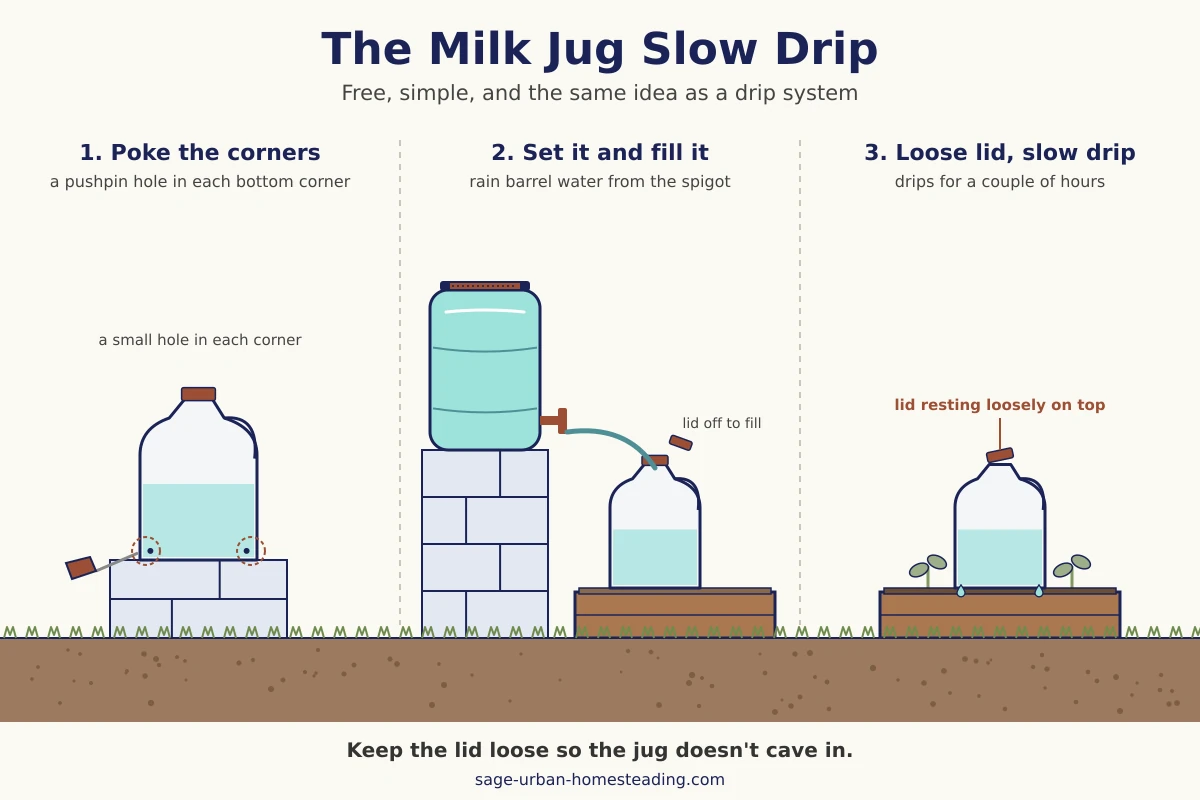
- Poke a small hole in each bottom corner of a clean plastic milk jug with a pushpin.
- Set the jug in the center of a garden area, near the plants that need water.
- Fill it from the top, with rain barrel water from a can or straight from the spigot.
- Put the lid back on very loosely.
The plants get a slow drip for a couple of hours. One special tip: keep that lid loose. If you screw it on tight, the change in air pressure as the water drains will collapse the top of the jug and deform it.
This is the same idea as a drip system, just smaller. If you're carrying water up a hill like we did, a few jugs set out in the beds make each trip count for more.


Not sure gravity watering is the right place to start? My free 2-page guide, Which Urban Homestead System Should You Start First?, helps you pick the one system that fits your space and your time, so you put your energy where it pays off first.
Soaker hose, drip line, or emitters?
All three can work off a barrel. The difference is which version you buy, because a lot of what's on the shelf is made for faucet pressure.
Soaker hose: easiest for a bed or two
A soaker hose weeps water along its whole length, so you just snake it through the bed. A regular soaker hose is made to be pushed by faucet pressure, though, and on a barrel it may barely seep at all. Look for one sold specifically for rain barrels or low pressure. Those have more porous walls so water can get out without much push.
I could not find a low-pressure soaker hose made for rain barrels on Amazon. The minimum said it needed 20 psi.I have no personal experience with this kind of product, but it looks like the simplest way to water one or two beds from a barrel without carrying anything. It works best when the beds are close to the barrel and level with it or downhill from it. Skip it if your beds are uphill from the barrel, or if a watering can at the spigot already feels easy enough.
Drip line: best when you want water at specific plants
Drip line is plastic tubing that carries water to the plants, either with emitters built in or with emitters you add. For a barrel, two things matter: use 1/2-inch tubing for the main line so water moves easily, and choose line and emitters labeled non-pressure-compensating.
I was able to find a gravity-fed drip irrigation kit for rain barrels on Amazon (affiliate link). It's a kit made for gravity feed that comes with low-pressure parts and a filter, which saves you from guessing in the irrigation aisle. Skip it if you only have one bed, since a rain barrel soaker hose is simpler and cheaper for that, if you can find one.
Emitters: why the usual ones don't work and what to use instead
Many drip emitters, especially the ones labeled pressure-compensating, have a little rubber diaphragm inside that keeps the flow even at faucet pressure. On a barrel, there isn't enough push to open it properly, so you get a weak drip or nothing. That's a parts problem, not a you problem.
What tends to work better at very low pressure:
- Simple non-pressure-compensating drippers. Sometimes sold as flag or take-apart drippers. Cheap, and easy to open and clean if one clogs.
- Adjustable bubblers. You can open them wider to let more water through at low pressure.
- Open 1/4-inch tubing. A short piece of small tubing running from the main line to a plant, with no emitter at all, works as a drip point. Keep the pieces about the same length so each plant gets a similar share.
Micro-sprayers and misters need real pressure. They're usually a disappointment on a barrel.
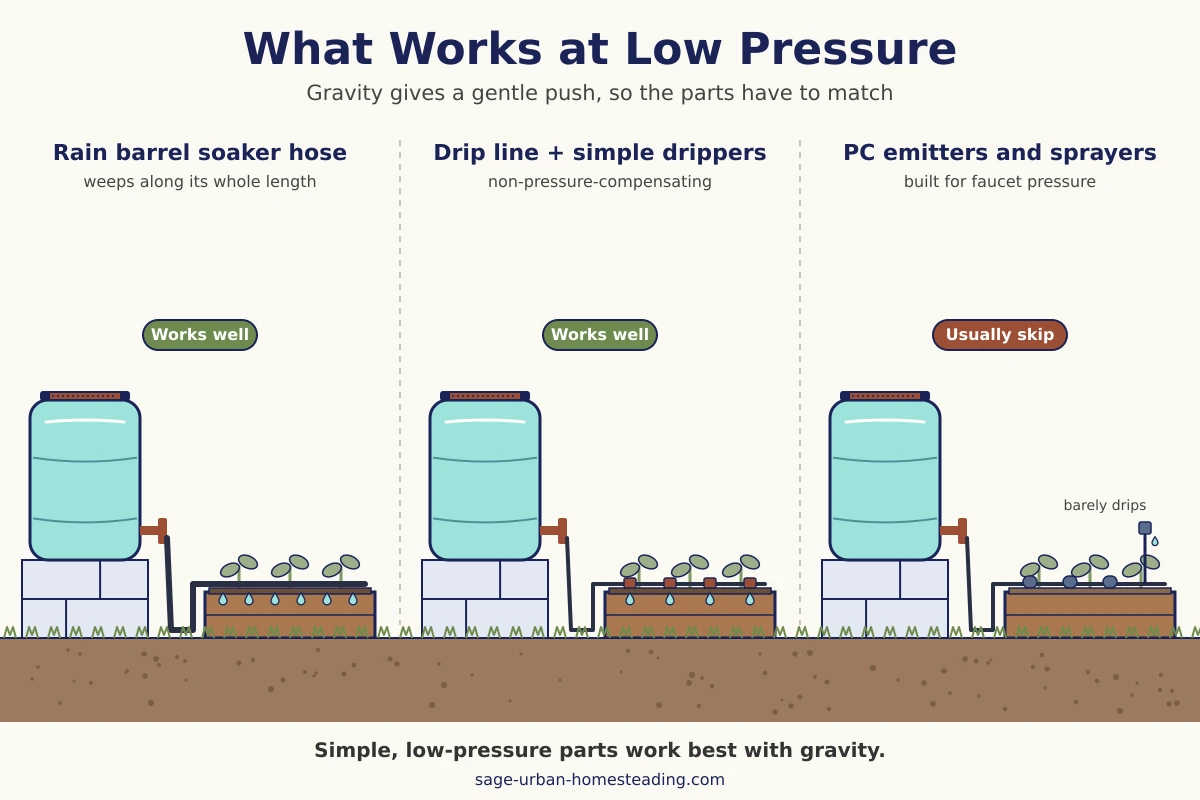 Rain barrel soaker hoses and simple drippers work with gravity. Pressure-compensating emitters and sprayers were built for faucet pressure.

Keep runs short and level or downhill
Every foot of tubing, every elbow, and every extra emitter uses up a little of your tiny bit of pressure. On flat ground, plan on watering roughly within 20 to 25 feet of the barrel.
- Put the barrel close to the beds. This does more than any part you can buy.
- Use 1/2-inch tubing for the main run, then short pieces of 1/4-inch tubing to individual plants.
- Keep each line level or running downhill. Water won't climb above the level of the water in your barrel. Even a small rise in the middle of a run can stop the flow past that point.
- Water one bed at a time if you have several. A small zone that gets water beats a big one that only gets wet near the barrel.
- Leave out fittings you don't need. Each splitter, valve, and sharp bend slows the water a little.
This is also where our current setup helps. Our tanks sit centrally, near the garden and the animals, so every run is short. If you're still choosing a spot for your barrel, choose the one closest to what you'll water. See How to Set Up a Rain Barrel.
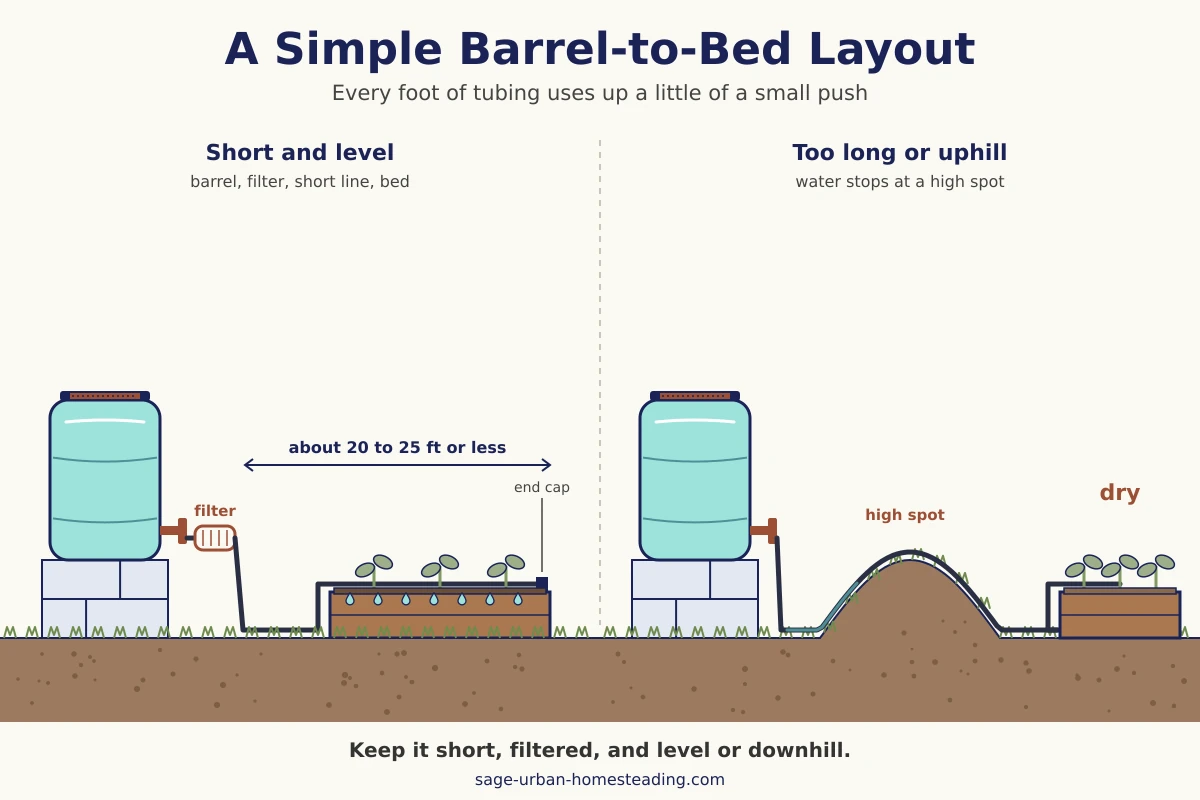 Barrel, filter, short line, bed. Keep it close and level or downhill, and the water reaches the end.

Sloped yards: let the hill do the work
A slope can be your best friend or your biggest headache, depending on where the barrel sits.
Ours was the headache version. Our gutters drained to the low end of the yard, near the basement door, so the barrels sat at the bottom of the hill. Barrel water reached the lower raised beds by hose. For the beds up the hill, we carried jugs. When we redid the roof, I wish we'd routed the gutters to the top of the hill instead. That one decision would have let gravity water most of the garden.
If you have a slope, here's what helps:
- Collect at the high side if you can. A barrel uphill from the beds gains pressure for every foot of drop. Downhill is free help.
- Run lines across the slope, not straight down it. Lines that follow the slope's contour stay level, so water spreads evenly instead of rushing to the bottom.
- Beds above the barrel won't get gravity water. Use jugs or a watering can for those, or plan to move the barrel or add a pump later. That's not a failure. It's just how water behaves.
- Look at your downspouts before you buy anything. Sometimes a different downspout or a diverter on another side of the house puts the barrel somewhere much more useful. See Downspout Diverter Options.
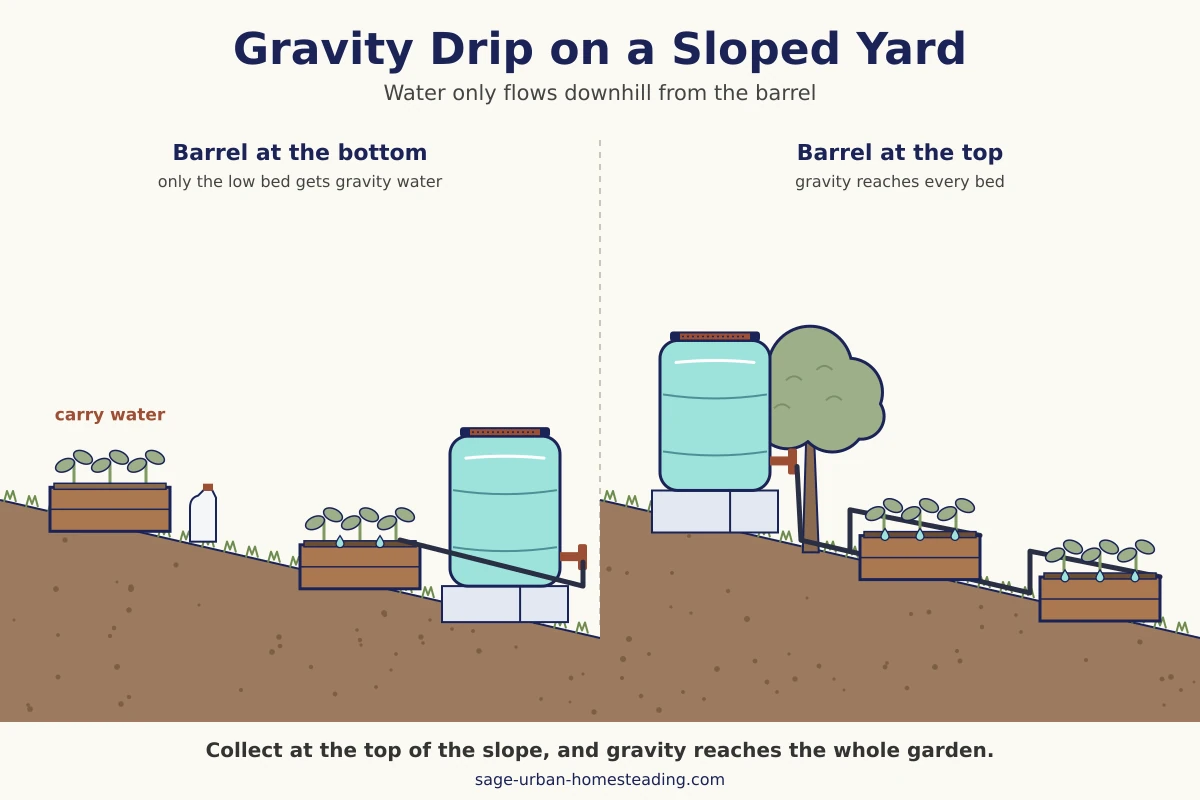 Water only flows downhill from the barrel. Collect at the top of the slope and gravity can reach the whole garden.

Filter so grit and algae don't clog the line
At faucet pressure, a little grit sometimes gets pushed through. At barrel pressure, it just sits there and plugs the emitter. That makes filtering more important with gravity, not less.
- Add a fine inline filter right after the spigot. A small screen filter that threads onto a hose connection is enough for most barrels. Clean it whenever the flow seems slower than usual. A clogged filter can stop a gravity line completely.
- Stop debris before it reaches the barrel. A screened lid and reasonably clean gutters keep out most of the leaves and grit. If your roof sits under trees, a first flush catches the dirtiest water off the roof. See First Flush Diverter Basics.
- Keep algae down in the barrel. Tiny bits of algae slip through filters and feed the slime that plugs emitters. Blocking light into the barrel is the fix that matters most. See Preventing Algae in Rain Barrels.
- Draw from a little above the bottom if you can. Sludge settles at the bottom of the barrel.
- Flush the line now and then. Open the far end and let water run out for a minute to carry out any grit that's settled inside.
You can buy an inline hose screen filter for drip irrigation on Amazon (affiliate link). It's a small filter that threads on between the spigot and the line. It's inexpensive, and it saves a lot of emitter-poking later. Skip it if your kit already includes one, or if you only use the barrel to fill watering cans.
Timers that work without pressure
Here's the honest part: most hose timers don't work well on a rain barrel.
The common battery hose timers use a valve that needs water pressure to open and close properly. On a barrel, some won't open at all. Others won't close all the way, and that's the one to watch for. People set up a standard timer, walk away, and come back the next morning to an empty barrel and an over-watered garden.
Timers that do work on a barrel use a small motor to turn a ball valve, so they don't depend on water pressure at all. Look for "zero pressure" and "ball valve" on the package or in the product listing. If it doesn't say both, assume it needs pressure.
You can buy a zero-pressure ball valve hose timer on Amazon (affiliate link). This is handy once your gravity setup is working and you're tired of remembering to turn it on and off, or you're away for a few days. Skip it if you're home most days and the spigot is right there, or if you're still figuring out how long your beds need to run.
How to tell if water is reaching the far end
With gravity, the plants nearest the barrel usually get the most water and the ones at the end get the least. A slow flow is normal. No flow at the end is the thing to fix.
- Feel the soil. After a run, push a finger a couple of inches into the soil next to the first plant and the last plant. Both should feel damp.
- Do the cup test. Set a small cup or jar under the first emitter and the last one. Run the system for 15 minutes, then compare. Some difference is normal. An empty cup at the end means that run is too long, too uphill, or clogged.
- Open the end cap. With the spigot on, open the far end of the line. Water should come out. If it doesn't, check the filter first, then look for a high spot or a kink.
- Check with the barrel full and nearly empty. Pressure drops as the barrel drains, so a run that works on a full barrel may stop working near the bottom.
If the end stays dry, shorten the run, raise the barrel a little, split the bed into two shorter lines, or swap the last few emitters for open tubing. Usually one of those does it.
What's a waste of money for gravity watering
These come up a lot. Here's the honest version.
- Pressure-compensating emitters and drip line. Great on a faucet. On a barrel, they often won't open properly.
- Micro-sprayers and misters. They need real pressure to spray.
- Standard battery hose timers. Many won't open or close fully without pressure. Get a zero-pressure ball valve timer, or keep turning the spigot by hand.
- A regular soaker hose. It may barely weep on a barrel. Buy one made for rain barrels.
- A big multi-bed kit for a flat yard. Gravity only carries water so far on level ground. Start with one bed close to the barrel.
- Sprinklers. There's no way to get sprinkler pressure from a backyard barrel without a pump.
Winter: drain the lines too
Water left in tubing, filters, and timers can freeze and crack them. When you put your barrels to bed for the season, take care of the drip parts at the same time.
- Unhook the line from the barrel and open the far end so the tubing drains.
- Bring the filter and any timer inside. Take the batteries out of the timer.
- Leave tubing and soaker hoses in place or coil them up, whichever is easier. Empty tubing handles cold fine.
We drain our barrels every fall and leave the spigots open, so draining the lines is just one more step on the same day. See Winterizing Rain Barrels.
FAQ for gravity drip irrigation rain barrels
How long should I run a gravity drip line?
How long should I run a gravity drip line?
Longer than the label suggests, because the flow is slower than the label assumes. Start with about twice what you'd guess, then check the soil a couple of inches down at the first and last plants. Adjust from there. Slow watering tends to soak in well, so you may find you need less extra time than you expected.
How many plants can one barrel water?
How many plants can one barrel water?
Fewer than you'd think in one run, and more than you'd think over a season. A 55-gallon barrel can empty in a few hours on a small drip zone, so water one bed at a time and let the next rain refill it. If you want more water on hand, a second barrel linked to the first is usually a better upgrade than a longer line. See How to Set Up a Rain Barrel.
Can I leave the drip line connected when it rains?
Can I leave the drip line connected when it rains?
Yes, as long as the spigot is closed. The barrel fills normally, and the extra water goes out the overflow. Make sure that overflow is going somewhere useful and away from your foundation. See Rain Barrel Overflow Routing.
Is gravity drip okay for vegetables?
Is gravity drip okay for vegetables?
It's a good fit, because drip puts water on the soil instead of on the leaves. Rain barrel water isn't as clean as tap water, so keep watering at the soil and rinse your harvest well with tap water before eating it.
Can I drink rain barrel water in an emergency?
Can I drink rain barrel water in an emergency?
For everyday use, keep rain barrel water for the garden. In an emergency, you can treat it the way you'd treat stream water when camping: filter it, then boil it. Boiling kills germs, but it won't remove chemicals that wash off a roof, so draw from your cleanest roof if you have a choice, ideally a metal one.
Gravity drip checklist
Here's the page in one place. Start at the top and stop when watering feels easy enough.
Start here
- Raise the barrel on a solid stand so a watering can fits under the spigot.
- Try milk jugs with pushpin holes and loose lids for a few thirsty plants.
- Pick the bed closest to the barrel, level with it or downhill from it.
If you add a hose or drip line
- Use a soaker hose made for rain barrels, or drip line with non-pressure-compensating emitters.
- Put a fine inline filter right after the spigot.
- Keep the run short (about 20 to 25 feet on flat ground) and level or downhill.
- Check that water reaches the last plant, with the barrel full and nearly empty.
Optional upgrades
- Add a zero-pressure ball valve timer once the setup works.
- On a slope, collect water at the high side if you can.
- Skip pressure-compensating emitters, micro-sprayers, and standard hose timers.
In the fall
- Unhook and drain the line, and bring the filter and timer inside.

Amy DeVries helps beginner urban homesteaders learn by doing. A lifelong gardener, she has grown food in spaces that expanded to 16 raised beds, patio containers, dwarf fruit and nut trees, and gravity-fed rainwater systems. She shares practical lessons shaped by real experience. Amy homeschools her children and teaches the same hands-on skills that guide her work.
More Information
Disclosure
All information found on this website is editorial in nature and intended to motivate and inspire rather than be used as medical advice or legal advice.
As an Amazon Associate, I earn from qualifying purchases. I also use Google Ads and cookies as described in the Privacy Policy.
Thank you for your support!
By Amy DeVries, Copyright © 2011-2026 Sage-Urban-Homesteading.com All rights reserved.
