FYI: This website contains affiliate links. As an Amazon Associate I earn from qualifying purchases.
Compost Pile for Beginners: The Low-Effort Way to Start
By Amy DeVries
Short answer: A compost pile for beginners can be one open pile in a back corner of the yard. Bury your kitchen scraps in it, cover them with leaves or old straw, and never turn it. After a year of adding, stop and let it sit for another year, then spread it on the garden. No math, no thermometer.
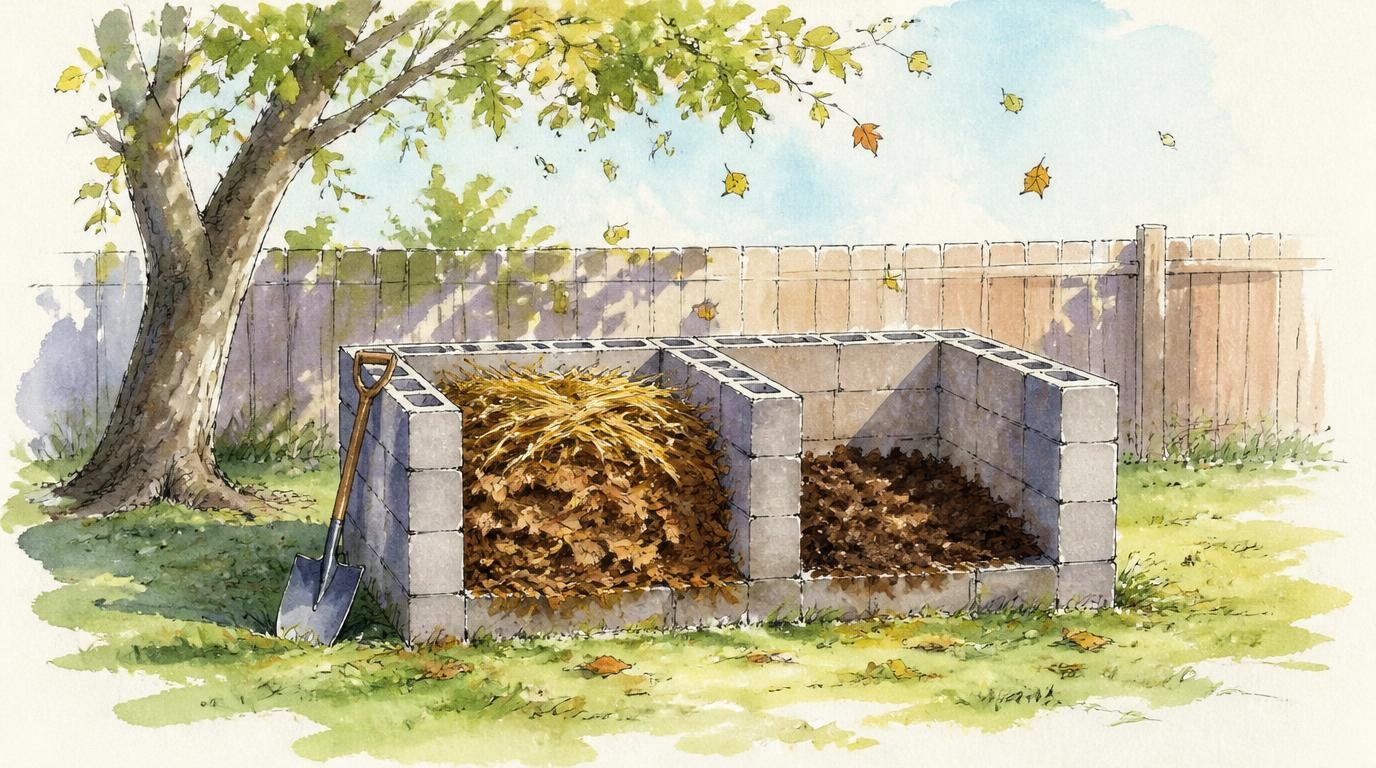 One corner, a few cinder blocks, and a pile of leaves. That's the whole setup.
If composting sounds smelly, fussy, or like a science project you'll get wrong, you're in good company. Most guides hand you a ratio to hit, a temperature to check, and a schedule for turning the pile. You don't need any of that to make good compost. You need a corner, some leaves, and patience.
We've kept an open compost pile in cinder blocks at both of our houses: our old quarter-acre place inside the Baltimore Beltway, and the 1920s house we rent now. We used to check ours with a thermometer. These days we never turn it, and we let every batch sit a full year before we use it.
Here's the smallest version that works, what goes in, how to tell when it's done, and what to do if you don't have a yard corner at all.
Where to put your compost pile
Pick a spot that's out of the way but still easy to reach with a container of scraps. You'll walk there a lot, and you'll want to.
- Away from the house. Ours is far enough from the house to keep any odors away, but close enough to walk to every day.
- Not right against a fence. At the Beltway house, a neighbor said our pile was too close to the fence, so we moved it to the back of the yard. Give your neighbors some room too.
- Shade is fine. The Beltway pile was in shade, and our pile now gets partial shade. Both have worked. We get regular rain here, so the pile stays damp back around the blocks in the shade, and we don't water it.
- Ask first if you rent. Our landlord was fine with a compost pile, but we had to get approval for where to put it.
The spot you choose will get better too. After we moved the Beltway pile, we planted a pair of Chinese chestnut trees. One went right where the compost had been. That tree grew taller faster than the other one and produced more chestnuts.
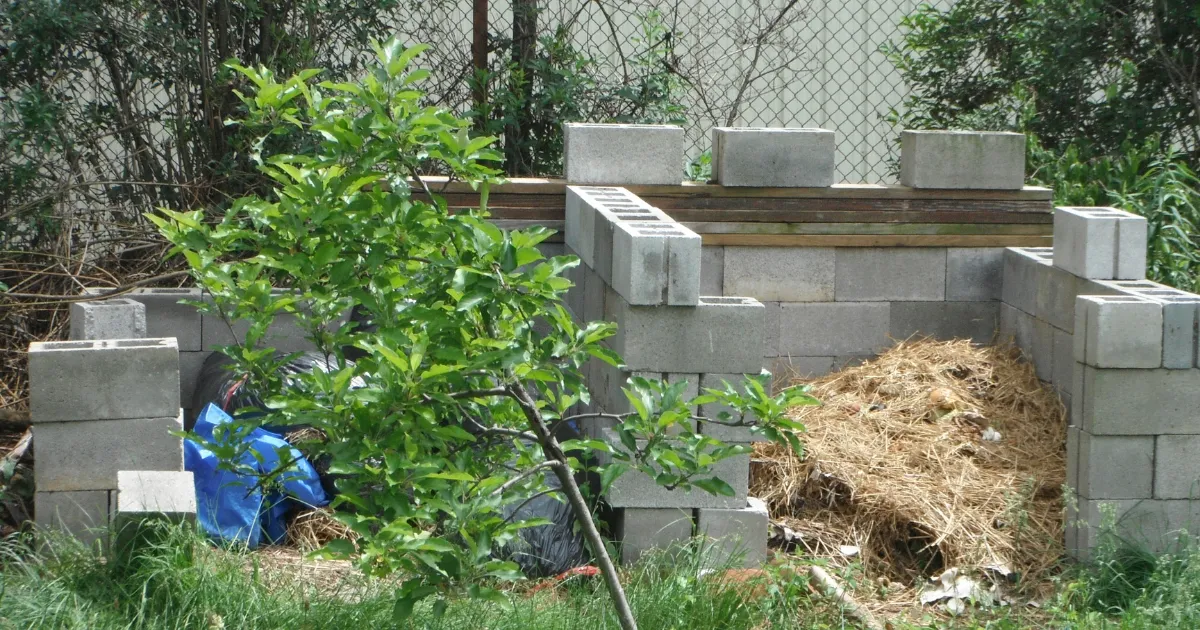 Our compost pile at the old Beltway house. Cinder blocks hold it in, no mortar needed.
Compost pile for beginners: Start with one bay
You only need one pile your first year. The second one comes later, once the first is full.
What you need
- A back corner of the yard (with your landlord's okay, if you rent)
- A small container in the kitchen for scraps
- A good, solid shovel. Any sturdy one works.
- Something brown and dry for the top: fallen leaves, old straw, or old hay
- Cinder blocks, if you'd like the pile to look neat. We use them at both houses.
That's all. No bin to buy, no thermometer, no special tools.
How to build it
- Set out the cinder blocks on three sides, with no mortar, and leave the front open for shoveling. Each of our bays is 4 blocks tall, 4 blocks along each side, and 5 blocks across the back, and the two bays share the middle wall. Each row is two blocks laid next to each other, and every other row turns the other way, so the seams don't line up.
- Start with a layer of leaves or straw on the ground inside it.
- Add your scraps, and dig them in a little so they're buried.
- Cover them with more leaves, straw, or hay. The brown layer on top is what keeps the pile from looking or smelling like garbage.
- Repeat every time you add scraps. That's the whole routine.
The daily routine
Before we had chickens, we kept a small container on the kitchen counter and dumped it on the compost pile. Now most of our food scraps go to the chickens. We keep one small container for chicken treats and a small foot-pedal garbage can for everything else, like onion skins and orange peels.
We try to empty both every day. In summer, you'll know you're waiting too long if you see maggots in the compost. Empty more often, and bury the fresh scraps under the leaves.
We never turn ours
Most guides say to turn your pile with a fork every few weeks so it breaks down faster. We never do. Sometimes we dig in to bury something deeper, and that's it. Ours isn't as wise as Marjory the Trash Heap from Fraggle Rock, but it does a lot of good just sitting there.
The tradeoff is time. Turning speeds things up, and skipping it means waiting longer. WVU Extension's article on Composting for Beginners notes that a pile you don't turn will still turn into finished compost, just more slowly. We'd rather wait than turn it.
What goes in your compost pile
What we add
- Kitchen scraps, like onion skins, orange peels, and anything the chickens don't get
- Leaves, old straw, or old hay, on top every time
- Everyday garden weeds
- Tomato plants at the end of the season, since they aren't good for our animals to eat
- Meat, greasy food, and dairy, buried deep (see the note below)
What stays out
- Especially bad weeds: poison ivy, wisteria, and Japanese knotweed
- Dog or cat waste. WVU Extension lists pet waste among the things not to compost.
A note on meat, greasy food, and dairy
Many guides, including WVU Extension, say to keep meat, greasy food, and dairy out of backyard compost. We don't. We compost ours or feed them to the chickens, because sending them down the drain or to the trash isn't a better answer. The key is burying them deep in the middle of the pile.
If you're brand new, start with plant scraps and leaves for the first few weeks. Wait until the pile is deep enough to bury things well before you add meat or dairy. Then follow the same habits that keep the pile safe: wear gloves when you work in it, wash your hands afterward, and let it sit for a full year before you use it.
If you're worried about rats, this page covers what we changed and what we'd check first. See Rats in Compost: How to Keep Them Out.
What about the rabbit manure?
We keep rabbits, and their manure is one of our best garden boosters. It doesn't go in the compost pile. We let it dry and pile up on its own for about six months, then use it to refresh our raised beds and GreenStalks. If you don't keep rabbits, skip this part. Your compost pile is plenty.
The two-bay system: One year adding, one year sitting
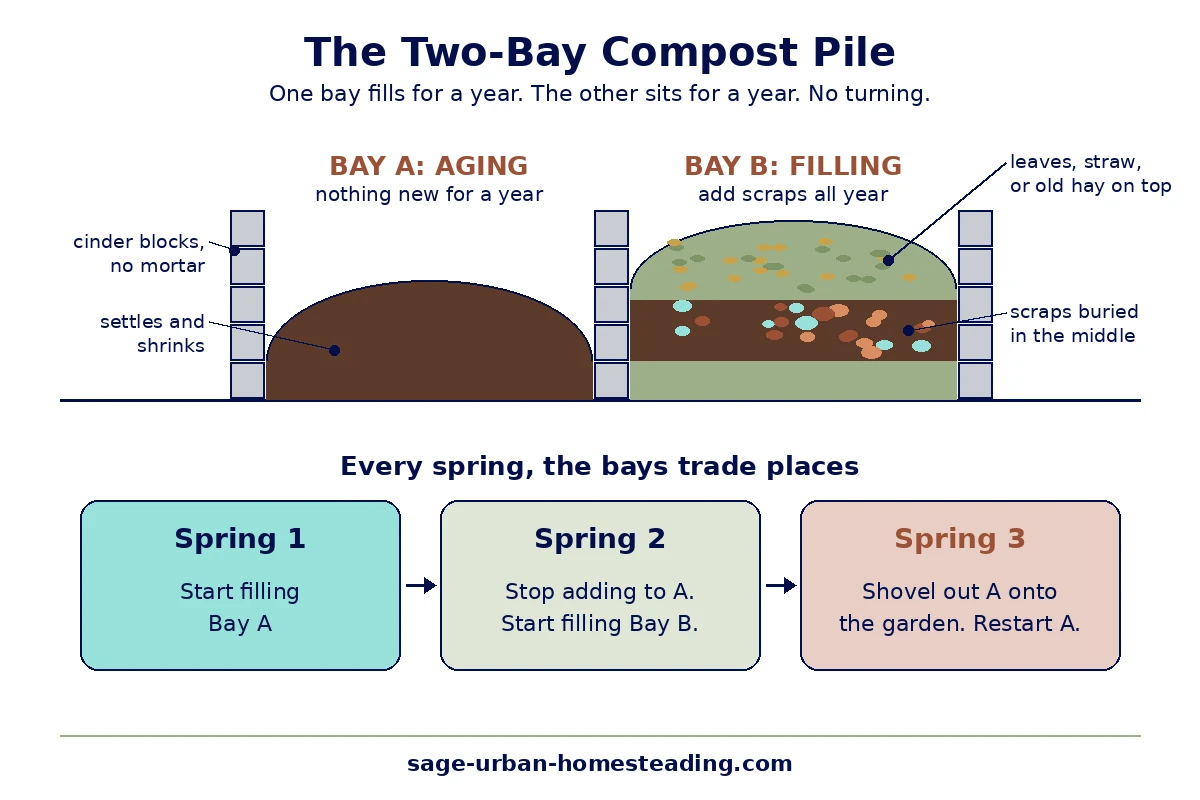
This is the part that makes our pile so low-effort. We have two bays side by side in the cinder blocks. One bay is the one we're adding to. The other is sitting and aging.
- First spring: start a pile in the first bay, and add to it all year.
- Second spring: stop adding to the first bay and let it sit. Start adding to the second bay instead.
- Third spring: the first bay has aged a full year. Shovel it out, spread it on the garden, and start a new pile in that empty bay.
After that, the two bays just take turns. Every spring, one bay is ready to use, and the other becomes the one you're filling.

We used to check our pile with a thermometer to make sure it got hot enough to kill weed seeds. Now we're confident that a full year gives it time to heat up and break down. If you'd like to check yours anyway, a thermometer is fine. You just don't need one to start.
How to know when it's finished
For us, the calendar decides. Once a bay has sat for a full year without anything new going in, it's ready the next spring.
You'll also see it. The pile shrinks a lot as it breaks down. Finished compost looks, feels, and smells like healthy soil. If you dig in and still find lots of recognizable scraps, give it a few more months.
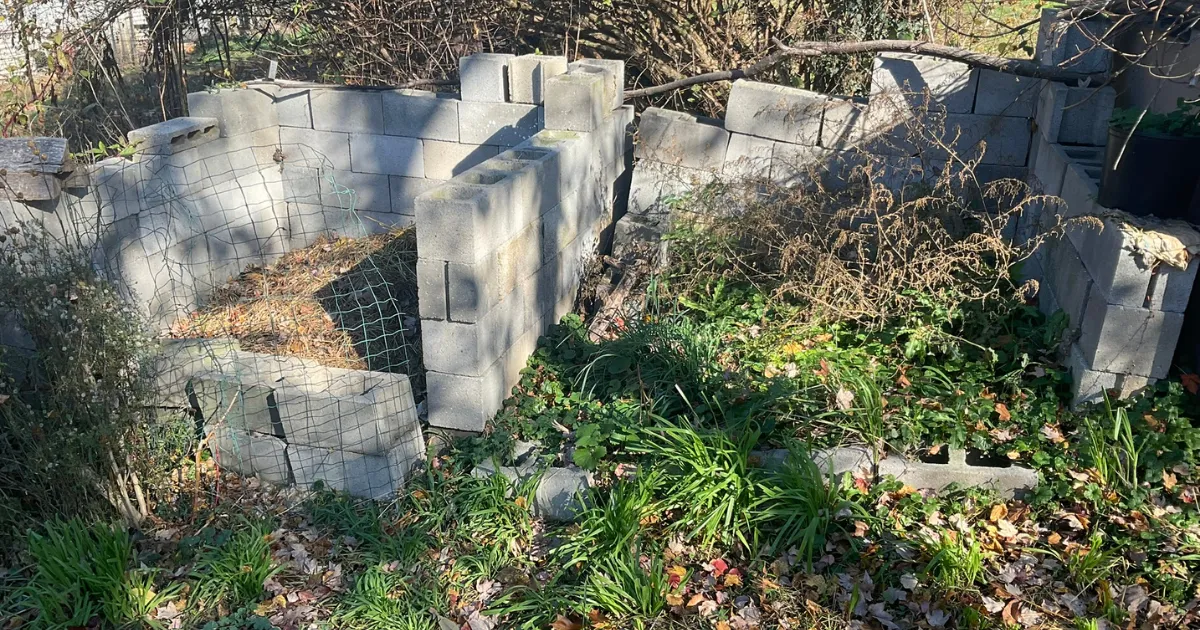 Our compost pile now. The wire across the front of the active bay keeps our dog out.
Using it
In spring, we shovel out the aged bay. The compost goes into our raised beds and flowerbeds, and into the hole with any tree or other plant we put in the ground. We also fill bare spots and holes in our pastures with it. Then that bay starts over as the new pile.
Common compost problems
Most compost problems are small and easy to fix. These are the ones we've run into, plus a couple you're likely to wonder about.
- Maggots in summer. You're letting the kitchen container sit too long, or scraps are sitting on top. Empty the container every day, and bury fresh scraps under leaves or straw.
- Potatoes sprouting in the pile. Potato peels and scraps love to sprout. We chop the sprouts back down into the compost with the shovel.
- It smells. You need more carbon. Add more leaves, straw, or hay on top.
- It's bone dry. Ours stays damp from regular rain in the shade, so we've never had to water it. If you're in a drier spot or a dry stretch, a pile that never gets damp will break down slowly.
- Your dog keeps getting in. We had to add some wire across the open front of the active pile to keep our dog out.
- It's taking forever. That's normal for a pile you don't turn. Plan on a year of sitting, and let it work.
- A neighbor complains. Move it away from the fence line. That's what we did at the Beltway house.
- Something has been digging in it. It may not be rats. Our trail camera has caught opossums, foxes, and raccoons visiting our cat food and water at night, and we've seen signs of something getting into our compost. We know they're around.
- You saw a rat. Don't panic, and you don't have to quit. Start by looking at what's near the pile, not just the pile itself. See Rats in Compost: How to Keep Them Out.
Worm bins: Honest results
You'll see worm bins recommended everywhere for small spaces, so here's how ours went.
At the Beltway house, we kept composting worms in a plastic tub in the basement. It developed mold, and we didn't enjoy the chore of cleaning it out to harvest the castings. Then we got busy with other projects and let it go. We've also tried spare large flowerpots with a newspaper on top. That was easy and cheap, but it dried out faster and was harder to harvest from.
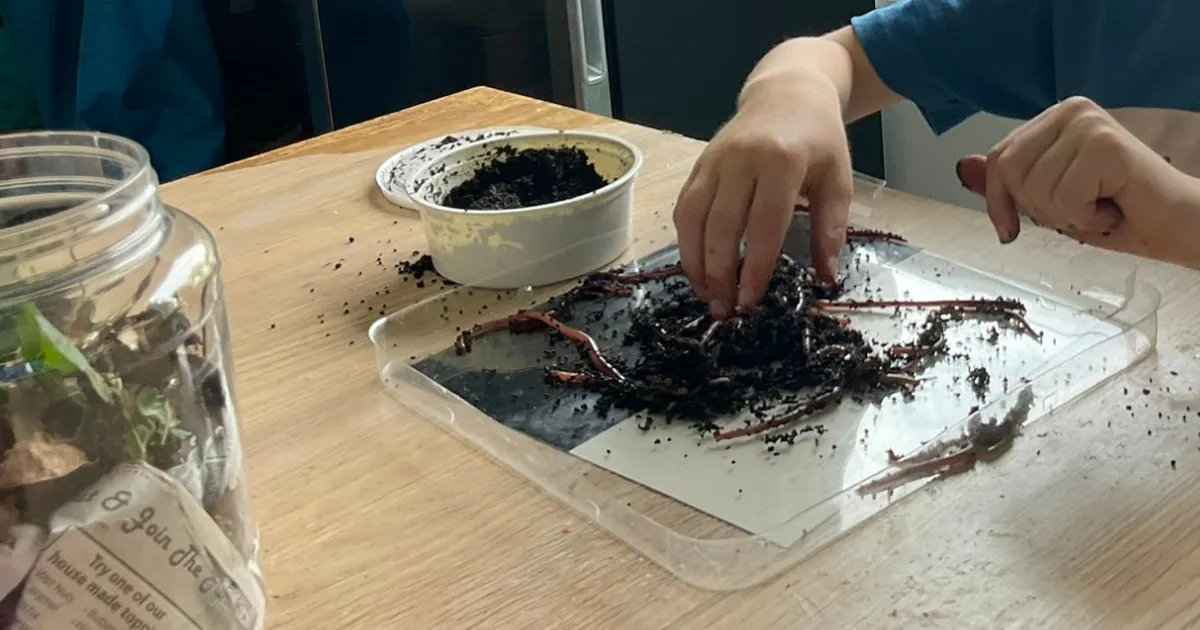 Red wigglers up close, from one of our homeschool lessons. They're about as long as your finger, but thin and reddish.
If you'd still like to try one:
- Use red wigglers, not worms from the garden. They live near the surface, which suits a shallow bin.
- Skip meat, cheese, and oils. A worm bin is small and shallow, with nowhere to bury them deep, and the fats go rancid and smell. That's different from our outdoor pile.
- Plan for upkeep. Harvesting the castings means moving everything to one side, adding fresh bedding and food to the other side, and waiting for the worms to move over.
A worm bin can work for someone without a yard who enjoys tending it. If you mostly want your scraps out of the trash with as little effort as possible, the outdoor pile, or a drop-off program, will be easier.
No yard corner? What you can do instead
An open pile needs a patch of ground. If you're on a balcony, in an apartment, or renting without a yard, you still have good options. None of them make you less of a homesteader.
If you rent and have a yard
Ask your landlord. Ours said yes, and the only thing we had to settle was where it would go. Come with a spot in mind, away from the house and the fence lines, and offer to keep it neat in cinder blocks.
Look for a food scrap drop-off
Some cities and counties collect food scraps at drop-off sites, often at farmers markets or public works yards, and turn them into compost. Montgomery County, Maryland, for example, lists drop-off locations for food scraps recycling around the county.
To find one near you, search your city or county website for "food scraps" or "compost drop-off." Rules vary, and some sites don't take meat or dairy, so check what yours accepts. Not every area has one. Ours doesn't, as far as I know.
Check your local rules
Some places have rules for backyard composting, such as requiring a closed bin for food scraps. Check your city or county before you build.
Try a worm bin, with honest expectations
A worm bin fits indoors, but read about how ours went before you buy one.
Grow something in the meantime
You don't need compost to start growing. A few pots on a patio or steps can give you real food this season. See Container Gardening for Beginners.
What to try next
Once your pile is started, pick the next small step that fits your space.
- You saw a rat, or you're worried you will. See Rats in Compost: How to Keep Them Out.
- You're ready to grow food in one small sunny spot, and you'd like somewhere to spread that compost. See Square Foot Gardening for Beginners..
- You only have a patio, steps, or a balcony. See Container Gardening for Beginners.
- Your garden fizzles by July because watering takes too long. See How to Save Time Watering Your Garden.
A compost pile is one small system. If you're wondering which one to start next, whether it's food, water, or home comfort, my free 2-page guide helps you pick one place to start. It's called Which Urban Homestead System Should You Start First?, and it's built for small spaces and busy lives.
Compost pile for beginners FAQ
Do I have to turn my compost pile?
Do I have to turn my compost pile?
No. We never turn ours. A pile you don't turn still becomes compost, it just takes longer. We let each bay sit a full year after we stop adding to it.
Do I need a compost bin?
Do I need a compost bin?
No. We use an open pile held in with cinder blocks, and we've never used a closed bin or a tumbler. Some places require a closed bin for food scraps, so check your local rules.
Will a compost pile smell?
Will a compost pile smell?
Ours doesn't bother us. It sits far enough from the house, and we cover every addition with leaves, straw, or old hay. If yours smells, bury the food deeper and add more on top. Odor can be sign that you need to add more carbon like leaves, straw, old hay, or wood shavings.
Can I put meat and dairy in compost?
Can I put meat and dairy in compost?
We do, buried deep in the middle of the pile, and we let it sit a full year before using it. Many guides say to keep them out. If you're new, start with plant scraps until the pile is deep enough to bury things well.
How long until the compost is ready?
How long until the compost is ready?
For our pile, about two years from the first scraps: one year of adding, then one year of sitting. After the first round, one bay is ready every spring.
Do I need a thermometer?
Do I need a thermometer?
No. We used one for years, and now we let time do the work instead. A full year of sitting gives the pile time to heat up and break down.
Can I compost without a yard?
Can I compost without a yard?
An open pile needs ground. Without a yard, look for a food scrap drop-off program near you, or try a worm bin if you'll enjoy tending it.
Your compost pile checklist
- Pick a back corner, away from the house and the fence line.
- If you rent, get your landlord's okay on the spot.
- Set out cinder blocks if you'd like it neat.
- Keep a small container in the kitchen, and empty it every day.
- Bury scraps and cover them with leaves, straw, or old hay.
- Wait until the pile is deep before adding meat or dairy, and bury it in the middle.
- Leave out poison ivy, wisteria, knotweed, and pet waste.
- Wear gloves in the pile, and wash your hands afterward.
- After a year, stop adding and start a second bay.
- After another year, shovel out the first bay and spread it on the garden.

Amy DeVries helps beginner urban homesteaders learn by doing. A lifelong gardener, she has grown food in spaces that expanded to 18 raised beds, patio containers, dwarf fruit and nut trees, and gravity-fed rainwater systems. She shares practical lessons shaped by real experience. Amy homeschools her children and teaches the same hands-on skills that guide her work.
More Information
Disclosure
All information found on this website is editorial in nature and intended to motivate and inspire rather than be used as medical advice or legal advice.
As an Amazon Associate, I earn from qualifying purchases. I also use Google Ads and cookies as described in the Privacy Policy.
Thank you for your support!
By Amy DeVries, Copyright © 2011-2026 Sage-Urban-Homesteading.com All rights reserved.
